Embarking on the journey of propagating native plants is akin to unlocking a secret code, a way to connect with the very essence of your local ecosystem. It’s about more than just growing plants; it’s about fostering biodiversity, supporting local wildlife, and contributing to the preservation of our natural heritage. This comprehensive guide will delve into the fascinating world of native plant propagation, equipping you with the knowledge and techniques to successfully cultivate these vital species.
Why Propagate Native Plants?
Before we dive into the ‘how,’ let’s explore the ‘why.’ Propagating native plants offers a multitude of benefits, both for you and the environment:
- Ecological Restoration: Native plants are the foundation of healthy ecosystems. By propagating them, you actively contribute to the restoration of degraded habitats and the creation of new ones.
- Supporting Wildlife: Native plants provide food and shelter for local wildlife, including birds, butterflies, pollinators, and other beneficial insects.
- Reducing Reliance on Non-Native Species: Non-native plants can sometimes outcompete native species, disrupting the delicate balance of the ecosystem. Propagating natives helps to counteract this.
- Conserving Biodiversity: By growing native plants, you help to preserve the genetic diversity of plant populations, making them more resilient to disease and environmental changes.
- Low-Maintenance Gardening: Native plants are often well-adapted to local conditions, requiring less water, fertilizer, and pesticides than non-native plants. This translates to less work for you and a more sustainable garden.
- Aesthetic Appeal: Native plants offer a unique beauty and charm, reflecting the natural landscape of your region. They often have interesting flowers, foliage, and seed heads that add visual interest to your garden.
Getting Started: Essential Tools and Materials
Before you begin, gather the necessary tools and materials to ensure a smooth and successful propagation process. Here’s a checklist:
- Seeds: The most fundamental starting point. Collect seeds from healthy, mature native plants in your area, or purchase them from reputable native plant nurseries.
- Seed Starting Mix: A sterile, well-draining mix is crucial for seed germination. Avoid using regular garden soil, which can harbor diseases and pests.
- Containers: Seed trays, pots, or even repurposed containers like yogurt cups can be used. Make sure they have drainage holes.
- Watering Can or Spray Bottle: Gentle watering is essential to avoid disturbing the seeds.
- Labels and Markers: Keep track of the plant species and sowing dates.
- Trowel or Small Shovel: For transplanting seedlings.
- Gloves: To protect your hands.
- Optional: Heating mat (for some species), grow lights (if indoor starting), plastic wrap or humidity dome (to maintain moisture).
Propagation Techniques: A Detailed Guide
Native plants can be propagated using various methods. The best approach depends on the species and your resources. Here’s a breakdown of the most common techniques:
1. Seed Propagation
Seed propagation is the most common and often the easiest method for propagating native plants. Here’s how to do it:
- Seed Collection: The timing of seed collection is critical. Research the specific species you want to propagate and learn when its seeds ripen. Collect seeds from healthy, disease-free plants. Allow seeds to fully mature on the plant before harvesting.
- Seed Cleaning and Storage: Once collected, clean the seeds to remove any debris. Dry the seeds thoroughly before storing them in a cool, dark, and dry place. A paper envelope or a sealed container works well. Some seeds require stratification (a period of cold, moist storage) to break dormancy. Research the specific requirements of your chosen species.
- Seed Starting: Fill your seed trays or pots with seed starting mix. Moisten the mix thoroughly. Sow the seeds according to the species’ specific requirements. Some seeds need to be surface-sown, while others need to be buried at a certain depth. Gently water the seeds after sowing.
- Providing Optimal Conditions: Place the seed trays or pots in a location with the appropriate light and temperature. Some species require full sun, while others prefer partial shade. Maintain consistent moisture in the seed starting mix, but avoid overwatering, which can lead to fungal diseases. A heating mat can help to maintain a consistent temperature for some species.
- Germination: Germination times vary depending on the species. Be patient and monitor the seed trays regularly. Once the seedlings emerge, provide adequate light and ventilation.
- Transplanting: Once the seedlings have developed a few sets of true leaves, they are ready to be transplanted into individual pots or directly into the garden. Harden off the seedlings gradually by exposing them to outdoor conditions for increasing periods of time before transplanting.
2. Vegetative Propagation (Cloning)
Vegetative propagation involves taking cuttings or divisions from a parent plant to create genetically identical offspring. This method allows you to replicate desirable traits and is often faster than seed propagation.
a) Cuttings
Cuttings are pieces of stem, leaf, or root that are used to grow new plants. Here’s how to propagate native plants from cuttings:
- Selecting the Right Cuttings: Choose healthy, vigorous stems or shoots from the parent plant. The best time to take cuttings is usually in the spring or early summer, when the plant is actively growing.
- Types of Cuttings: There are several types of cuttings, including stem cuttings (the most common), leaf cuttings, and root cuttings. The type of cutting you use will depend on the plant species.
- Preparing Cuttings: For stem cuttings, cut a 4-6 inch section of stem, removing the leaves from the bottom half. Dip the cut end in rooting hormone (optional, but can improve success rates).
- Rooting Cuttings: Insert the cuttings into a rooting medium, such as seed starting mix or a mix of perlite and vermiculite. Keep the rooting medium moist but not soggy. Provide bright, indirect light.
- Root Development: Root development can take several weeks or months, depending on the species. Gently tug on the cutting to check for root development.
- Transplanting: Once the cuttings have developed roots, transplant them into individual pots or directly into the garden.
b) Division
Division is a simple method of vegetative propagation that works well for many herbaceous perennials and some shrubs. It involves separating a clump of roots and stems into multiple plants.
- Timing: The best time to divide plants is usually in the spring or fall, when the plant is dormant or semi-dormant.
- Lifting the Plant: Carefully dig up the entire plant, taking care not to damage the roots.
- Separating the Roots: Gently shake off the excess soil and separate the clump of roots using your hands or a sharp knife. Each division should have a good portion of roots and stems.
- Replanting: Replant the divisions immediately in the garden or in individual pots. Water thoroughly.
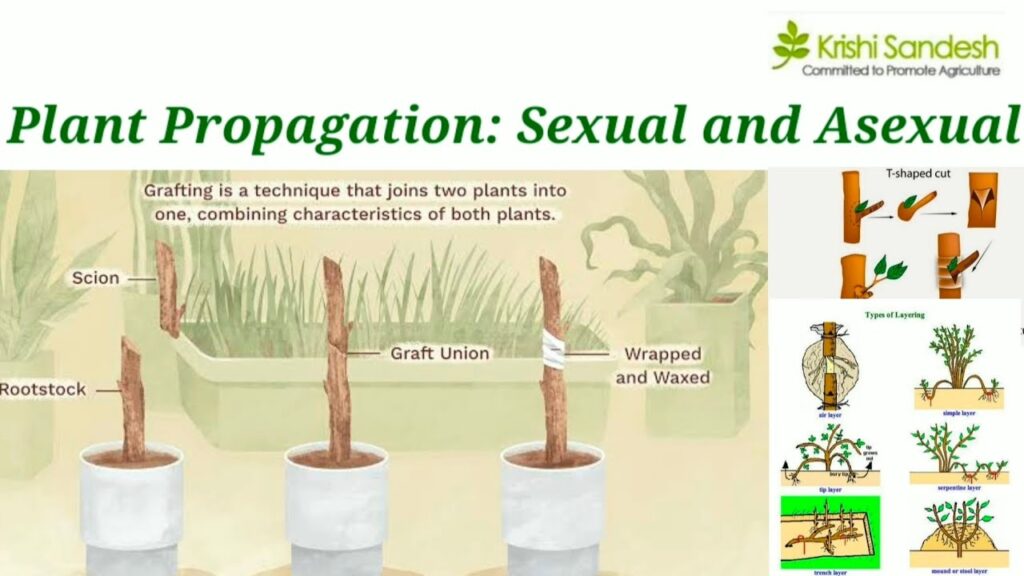
3. Layering
Layering is a natural method of propagation where a stem is bent down to the ground and allowed to root while still attached to the parent plant. Once roots develop, the stem can be severed and planted as a new plant.
- Selecting the Stem: Choose a flexible stem that can be bent down to the ground.
- Preparing the Layer: Wound a small section of the stem where it will touch the soil. This will encourage root development.
- Burying the Layer: Bury the wounded section of the stem in the soil, securing it with a wire pin or a rock.
- Rooting: Keep the soil moist. Root development can take several months.
- Severing and Transplanting: Once roots have developed, sever the stem from the parent plant and transplant the new plant.
4. Bulbs, Corms, and Rhizomes
Some native plants, such as bulbs, corms, and rhizomes, can be propagated by separating these structures. This is a straightforward method:
- Digging Up the Plant: Carefully dig up the plant during its dormant period.
- Separating the Structures: Gently separate the bulbs, corms, or rhizomes, ensuring that each division has some roots and buds.
- Replanting: Replant the divisions immediately.
Common Challenges and Solutions
Propagating native plants can be a rewarding experience, but it’s not without its challenges. Here are some common problems and how to overcome them:
- Poor Germination:
- Cause: Poor seed quality, incorrect sowing depth, inadequate moisture, or improper temperature.
- Solution: Use fresh seeds, sow seeds at the correct depth, maintain consistent moisture, and provide the appropriate temperature. Consider using a seed starting mix.
- Fungal Diseases:
- Cause: Overwatering, poor air circulation, or contaminated soil.
- Solution: Avoid overwatering, provide good air circulation, use sterile seed starting mix, and consider using a fungicide if necessary.
- Pests:
- Cause: Aphids, spider mites, or other pests can damage seedlings.
- Solution: Inspect seedlings regularly for pests. Use insecticidal soap or other appropriate pest control methods if necessary.
- Damping-off:
- Cause: A fungal disease that attacks seedlings at the soil line.
- Solution: Use sterile seed starting mix, avoid overwatering, and provide good air circulation.
- Slow Growth:
- Cause: Insufficient light, nutrient deficiencies, or poor soil conditions.
- Solution: Provide adequate light, fertilize seedlings with a balanced fertilizer, and ensure that the soil is well-draining.
Species-Specific Considerations
While the general techniques outlined above apply to most native plants, it’s essential to research the specific requirements of the species you want to propagate. Consider the following:
- Seed Dormancy: Many native plant seeds have dormancy mechanisms that prevent them from germinating immediately. Research the dormancy requirements of your chosen species. Some common methods to break dormancy include stratification (cold, moist storage), scarification (scratching or nicking the seed coat), and soaking in water.
- Light Requirements: Some seeds require light to germinate, while others need darkness. Research the light requirements of your chosen species.
- Soil Preferences: Native plants have different soil preferences. Research the soil requirements of your chosen species and amend the soil accordingly.
- Watering Needs: Native plants have varying watering needs. Research the watering requirements of your chosen species and water accordingly.
- Pest and Disease Resistance: Some native plants are more susceptible to pests and diseases than others. Research the common pests and diseases that affect your chosen species and take preventative measures.
Ethical Considerations in Native Plant Propagation
As you embark on your propagation journey, it’s crucial to consider the ethical aspects of working with native plants:
- Seed Source: Always collect seeds from a sustainable source. Avoid collecting seeds from protected areas or areas where the plant population is already under stress. Purchase seeds from reputable native plant nurseries.
- Genetic Diversity: When collecting seeds, collect from multiple plants to ensure genetic diversity.
- Local Provenance: Use seeds and plant material that are sourced from your local area. This ensures that the plants are well-adapted to your local climate and conditions.
- Avoid Hybridization: Be careful to avoid cross-pollination between native plants and non-native plants. This can lead to the loss of genetic purity.
- Respect for the Environment: Always practice responsible gardening practices, such as avoiding the use of pesticides and herbicides.
Conclusion: Cultivating a Greener Future
Propagating native plants is a fulfilling and impactful endeavor. By understanding and applying the techniques outlined in this guide, you can contribute to the conservation of biodiversity, support local wildlife, and create a beautiful and sustainable garden. Embrace the challenge, experiment with different methods, and enjoy the process of cultivating these remarkable plants. Your efforts will not only enhance your own surroundings but also help to build a healthier and more resilient planet for generations to come. So, get your hands dirty, connect with nature, and start propagating the beauty of native plants today! The rewards are immeasurable, and the impact you make will resonate far beyond your own backyard.
Happy propagating!


