DIY Garden Irrigation Systems: Your Ultimate Guide to Thriving Gardens
Are you tired of lugging heavy watering cans around your garden, only to find some plants parched while others are waterlogged? Do you dream of a lush, vibrant garden that practically takes care of itself? If so, you’re in the right place. Building your own DIY garden irrigation system is a rewarding project that can save you time, water, and effort, while ensuring your plants receive the hydration they need to flourish. This comprehensive guide will walk you through everything you need to know, from planning and design to installation and maintenance, so you can create a thriving garden oasis.
Why Choose a DIY Garden Irrigation System?
Before we dive into the specifics, let’s explore the compelling reasons why a DIY garden irrigation system is a smart choice:
- Water Conservation: Efficient irrigation systems deliver water directly to the roots, minimizing water waste through evaporation and runoff. This is not only environmentally friendly but can also significantly reduce your water bill.
- Time Savings: Say goodbye to the daily chore of hand-watering. An automated system will water your plants on a schedule, freeing up your time for other gardening tasks or simply relaxing and enjoying your beautiful garden.
- Healthier Plants: Consistent and targeted watering promotes strong root development and healthier plants. Your plants will receive the right amount of water at the right time, leading to increased yields and vibrant blooms.
- Customization: DIY systems allow you to tailor the irrigation to your specific garden layout, plant types, and water needs. You can create zones with different watering schedules and flow rates to accommodate various plant requirements.
- Cost-Effectiveness: While the initial investment is required, a DIY system can be more affordable than professionally installed systems. You can start small and expand your system as your garden grows.
Planning Your DIY Garden Irrigation System
Careful planning is the cornerstone of a successful irrigation system. Before you start gathering supplies, take the time to assess your garden and determine your needs. Here’s a step-by-step guide to help you plan effectively:
1. Assess Your Water Source
The first step is to identify your water source. This is typically an outdoor spigot connected to your home’s water supply. Consider the following:
- Water Pressure: Check your water pressure using a pressure gauge. The ideal pressure for most irrigation systems is between 20 and 60 PSI (pounds per square inch). If your pressure is too high, you’ll need a pressure regulator. If it’s too low, you may need to supplement with a water pump.
- Water Flow Rate: Measure your water flow rate in gallons per minute (GPM). You can do this by timing how long it takes to fill a 5-gallon bucket. This information is crucial for determining the capacity of your system.
- Water Availability: Consider any water restrictions in your area. You may need to adjust your watering schedule or choose water-efficient irrigation methods.
2. Map Your Garden Layout
Create a detailed map of your garden, including the following elements:
- Plant Locations: Mark the location of all your plants, including flower beds, vegetable gardens, trees, and shrubs. Note the water requirements of each plant type.
- Hardscapes: Identify any pathways, patios, or other hard surfaces in your garden. These areas should not be watered.
- Sun and Shade: Note the areas that receive full sun, partial shade, and full shade. Plants in sunny areas will typically require more water than those in shaded areas.
- Water Source and Spigot Locations: Mark the location of your water source and any existing spigots.
3. Determine Your Irrigation Zones
Divide your garden into zones based on plant water requirements, sun exposure, and soil type. This allows you to customize the watering schedule for each area. For example, you might have separate zones for:
- Vegetable Garden: These plants often need consistent watering.
- Flower Beds: Different flowers will have different watering needs.
- Lawn: Lawns typically require less frequent, but deep watering.
- Trees and Shrubs: Established trees and shrubs often need deep, infrequent watering.
4. Choose Your Irrigation Method
There are several irrigation methods to choose from, each with its own advantages and disadvantages:
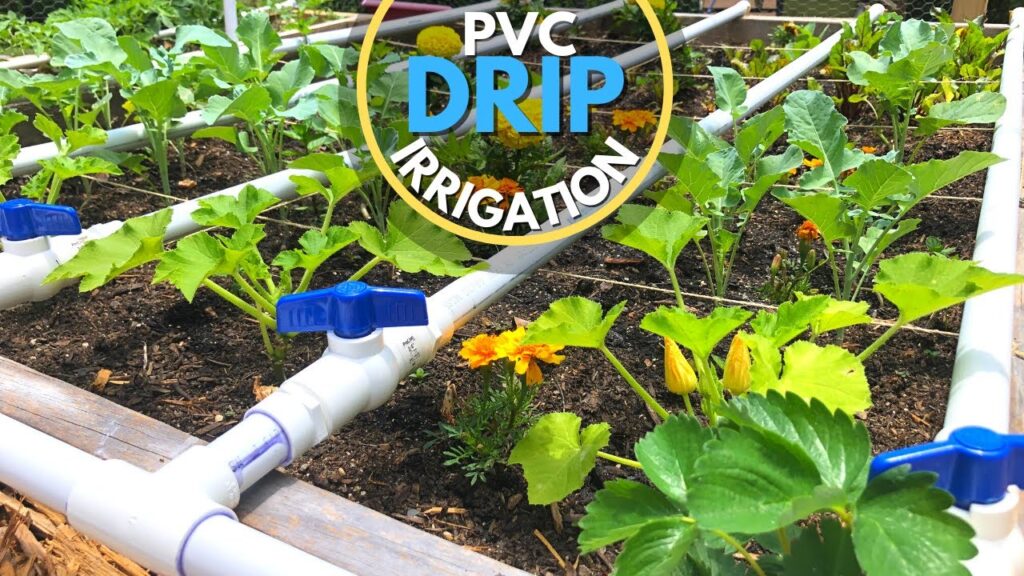
- Drip Irrigation: This method delivers water directly to the roots of plants through a network of tubing and emitters. It’s highly efficient, minimizes water waste, and is ideal for vegetable gardens, flower beds, and container plants.
- Soaker Hoses: These hoses slowly release water along their entire length, providing a gentle and even watering. They are best suited for long rows of plants or planting beds.
- Sprinkler Systems: Sprinklers are a good option for lawns and larger areas. However, they can be less efficient than drip irrigation, as they can lose water to evaporation and wind.
- Micro-Sprinklers: These small sprinklers are ideal for watering shrubs, ground cover, and other plants with moderate water needs.
5. Calculate Your Water Requirements
Determine the amount of water each zone requires based on the plant types, soil type, and weather conditions. You can use online calculators or consult with a local gardening expert to estimate your water needs.
Essential Components of a DIY Garden Irrigation System
Once you’ve planned your system, it’s time to gather the necessary components. Here’s a list of essential parts and their functions:
- Backflow Preventer: This device prevents contaminated water from flowing back into your home’s water supply. It’s a crucial safety component and is often required by local codes.
- Pressure Regulator: This device reduces the water pressure from your spigot to the optimal level for your irrigation system (typically 20-30 PSI).
- Filter: A filter removes debris and sediment from the water, preventing clogs in your emitters and sprinklers.
- Timer/Controller: This device controls the watering schedule. You can choose from manual timers, digital timers, or smart controllers that can be programmed to water automatically.
- Main Line Tubing: This is the primary tubing that runs from your water source to your irrigation zones. It’s typically made of polyethylene (PE) tubing and comes in various sizes.
- Zone Valves: These valves control the flow of water to each zone. They are typically connected to the timer/controller and open and close automatically.
- Fittings: A variety of fittings are used to connect the tubing, valves, and emitters. These include elbows, tees, couplings, and adapters.
- Emitter Tubing/Drip Line: This tubing carries water to the individual plants. It can be pre-spaced with emitters or you can add your own emitters.
- Emitters/Sprinklers: These devices release water to the plants. Emitters are used in drip irrigation and release water at a slow and steady rate. Sprinklers are used in sprinkler systems and deliver water over a wider area.
- Stakes and Supports: These are used to secure the tubing and emitters in place.
Step-by-Step Guide to Building Your DIY Garden Irrigation System
Now that you have a solid understanding of the planning process and the necessary components, let’s dive into the step-by-step instructions for building your DIY garden irrigation system:
1. Connect to Your Water Source
Start by connecting the backflow preventer to your outdoor spigot. Then, connect the pressure regulator to the backflow preventer. Finally, attach the filter to the pressure regulator.
2. Install the Timer/Controller
Mount the timer/controller in a convenient location, such as on a wall or fence. Connect the wires from the timer/controller to the zone valves. Follow the manufacturer’s instructions for programming the timer/controller.
3. Lay the Main Line Tubing
Run the main line tubing from your water source to each of your irrigation zones. Use elbows, tees, and other fittings to navigate around obstacles and create the desired layout. Bury the main line tubing underground for a more aesthetically pleasing look and to protect it from damage.
4. Install the Zone Valves
Place the zone valves at the beginning of each irrigation zone. Connect the main line tubing to the inlet and outlet of each valve. Ensure the valves are properly connected to the timer/controller.
5. Install the Emitter Tubing or Drip Line
For drip irrigation, connect the emitter tubing or drip line to the main line tubing using appropriate fittings. Run the emitter tubing along the rows of plants or around the base of individual plants. If using individual emitters, insert them into the emitter tubing at the desired spacing.
6. Install Sprinklers (if applicable)
If you’re using sprinklers, connect the sprinklers to the main line tubing using risers and sprinkler heads. Adjust the sprinkler heads to ensure proper coverage.
7. Test the System
Before planting, turn on the water and test the system. Check for leaks and ensure that all emitters and sprinklers are functioning properly. Adjust the flow rates and sprinkler heads as needed.
8. Bury the Tubing (Optional)
Once you’ve tested the system and are satisfied with the layout, you can bury the tubing. Dig shallow trenches and carefully place the tubing in the trenches. Cover the tubing with soil and gently tamp it down.
Tips for Optimizing Your DIY Garden Irrigation System
To maximize the effectiveness and longevity of your DIY garden irrigation system, consider these helpful tips:
- Choose the Right Emitters: Select emitters with the appropriate flow rate for your plants’ water needs. Consider using adjustable emitters for flexibility.
- Space Emitters Properly: Space emitters according to the plant’s mature size and water requirements.
- Use a Pressure Gauge: Regularly monitor your water pressure to ensure it’s within the recommended range.
- Flush the System Regularly: Flush the system periodically to remove any debris that may have accumulated in the tubing or emitters.
- Check for Leaks: Inspect your system regularly for leaks. Repair any leaks promptly to prevent water waste and damage.
- Winterize Your System: In colder climates, winterize your system by draining the water from the tubing and components to prevent freezing and damage.
- Monitor Weather Conditions: Adjust your watering schedule based on weather conditions. Reduce watering during rainy periods and increase watering during hot, dry spells.
- Consider a Rain Sensor: A rain sensor can automatically shut off your irrigation system when it rains, conserving water and preventing overwatering.
- Use Mulch: Applying a layer of mulch around your plants helps retain moisture in the soil, reducing the need for frequent watering.
- Group Plants with Similar Water Needs: Group plants with similar water requirements together to simplify your irrigation design and improve efficiency.
Troubleshooting Common Irrigation Problems
Even with careful planning and installation, you may encounter some common problems with your DIY garden irrigation system. Here’s how to troubleshoot them:
- Low Water Pressure: Check your water pressure with a pressure gauge. If the pressure is too low, you may need to adjust the pressure regulator or consider a booster pump. Also, check for any kinks or blockages in the tubing.
- Clogged Emitters: Clogged emitters are a common problem. Flush the system regularly to remove debris. You can also clean individual emitters with a small brush or pin.
- Leaks: Check all connections for leaks. Tighten any loose fittings or replace any damaged components.
- Uneven Watering: If some areas of your garden are receiving more water than others, adjust the emitter spacing or flow rates. You may also need to adjust the sprinkler heads for better coverage.
- Timer Malfunction: If your timer is not working properly, check the batteries and the programming. You may need to replace the timer.
- Frozen Components: In cold climates, frozen components can damage your system. Drain the water from the system and winterize it properly to prevent freezing.
Advanced DIY Garden Irrigation Techniques
Once you’ve mastered the basics of DIY garden irrigation, you can explore some advanced techniques to further enhance your system:
- Smart Irrigation Controllers: Upgrade to a smart irrigation controller that uses weather data and soil moisture sensors to automatically adjust your watering schedule.
- Subsurface Drip Irrigation (SDI): Install drip lines below the soil surface to deliver water directly to the roots, minimizing evaporation and weed growth.
- Fertigation: Incorporate a fertilizer injector into your system to deliver nutrients directly to your plants through the irrigation water.
- Automated Shut-Off Valves: Install automated shut-off valves that can be controlled remotely or by a central control system.
- Water Harvesting: Integrate a rainwater harvesting system to collect rainwater for irrigation.
Maintaining Your DIY Garden Irrigation System
Regular maintenance is essential to ensure the long-term performance and efficiency of your DIY garden irrigation system. Here’s a maintenance checklist:
- Inspect for Leaks: Regularly inspect your system for leaks. Repair any leaks promptly to prevent water waste and damage.
- Clean Filters: Clean the filter regularly to remove debris and sediment.
- Flush the System: Flush the system periodically to remove any clogs.
- Check Emitters: Inspect the emitters for clogs and replace any damaged emitters.
- Adjust the Watering Schedule: Adjust the watering schedule based on weather conditions and plant needs.
- Winterize Your System: In colder climates, winterize your system to protect it from freezing.
- Replace Components as Needed: Replace any worn or damaged components as needed.
Conclusion: Embrace the Benefits of a DIY Garden Irrigation System
Building a DIY garden irrigation system is a rewarding project that can transform your garden into a thriving oasis. By following the steps outlined in this guide, you can create a system that saves you time, water, and effort, while ensuring your plants receive the hydration they need to flourish. Embrace the benefits of a DIY irrigation system and enjoy the beauty and bounty of a well-watered garden.
Whether you’re a seasoned gardener or a beginner, a DIY irrigation system is a worthwhile investment. It’s a practical, efficient, and environmentally friendly way to keep your plants healthy and happy. So, get started today, and watch your garden thrive!


