Build Your Dream Garden: Comprehensive Raised Garden Bed Construction Plans for Beginners to Experts
Are you dreaming of a vibrant, thriving garden bursting with fresh vegetables, fragrant herbs, and colorful flowers? Do you yearn for the satisfaction of harvesting your own food, knowing exactly where it came from and how it was grown? If so, you’re in the right place. Building raised garden beds is a fantastic way to achieve these goals, offering a wealth of benefits for both novice and experienced gardeners alike. This comprehensive guide provides everything you need to know to construct your own raised garden beds, from detailed construction plans to tips on materials, soil, and ongoing maintenance. Let’s get started on transforming your backyard into a flourishing oasis!
Why Choose Raised Garden Beds? Unveiling the Advantages
Before diving into the construction plans, let’s explore the compelling reasons why raised garden beds are a superior choice for many gardeners. These benefits extend beyond aesthetics and can significantly impact the health of your plants and the ease of your gardening experience.
- Improved Drainage: Raised beds offer excellent drainage, which is crucial for preventing root rot and ensuring healthy plant growth. The elevated design allows excess water to drain away, creating an ideal environment for plant roots.
- Enhanced Soil Quality: You have complete control over the soil composition in your raised beds. You can fill them with nutrient-rich, well-draining soil, tailored to the specific needs of your plants. This leads to healthier plants and higher yields.
- Extended Growing Season: Raised beds warm up faster in the spring and cool down slower in the fall, effectively extending your growing season. This allows you to start planting earlier and harvest later in the year.
- Reduced Back Strain: Raised beds elevate the planting surface, reducing the need to bend and stoop. This is particularly beneficial for gardeners with back problems or mobility issues.
- Weed Control: With the right construction and soil preparation, raised beds can significantly reduce weed growth. The barrier of the bed’s sides and the quality of the soil help to keep weeds at bay.
- Pest Management: Raised beds can make it easier to manage pests. The elevated design can deter some ground-dwelling pests, and the contained environment allows for more targeted pest control methods.
- Aesthetic Appeal: Raised beds add a touch of elegance and structure to your garden. They can be customized to match your personal style and enhance the overall beauty of your outdoor space.
- Accessibility: Raised beds can be designed to be wheelchair accessible, making gardening a possibility for everyone.
Planning Your Raised Garden Beds: A Step-by-Step Guide
Before you start hammering nails and sawing wood, careful planning is essential for a successful raised garden bed project. This involves considering several factors to ensure your garden beds meet your needs and thrive in your specific environment.
1. Location, Location, Location
Choosing the right location is paramount. Consider the following:
- Sunlight: Most vegetables and flowers require at least 6-8 hours of direct sunlight per day. Observe your yard throughout the day to identify areas that receive adequate sunlight.
- Water Access: Ensure easy access to a water source for irrigation. This will make watering your plants much more convenient.
- Drainage: Avoid areas with poor drainage, such as low-lying spots that tend to collect water. Good drainage is crucial for the health of your plants.
- Accessibility: Choose a location that is easily accessible for you to tend to your garden. Consider the distance from your house and the terrain of your yard.
- Wind Protection: If your area is prone to strong winds, consider placing your raised beds in a location that offers some protection, such as near a fence or building.
2. Size and Shape
The size and shape of your raised beds will depend on your available space, the types of plants you want to grow, and your personal preferences. Here are some general guidelines:
- Width: A width of 3-4 feet is generally recommended to allow easy access to the center of the bed without stepping on the soil.
- Length: The length can be customized to fit your space. Consider the dimensions of your yard and the number of plants you want to grow.
- Height: The height of your raised beds can vary. Beds that are 12-24 inches high are generally sufficient for most plants. Taller beds may be easier to work with and provide better drainage.
- Shape: Raised beds can be rectangular, square, circular, or any shape you desire. Consider the aesthetic appeal and the functionality of the shape.
3. Material Selection
The material you choose for your raised beds will influence their durability, appearance, and environmental impact. Here are some common options:
- Wood: Wood is a popular choice due to its affordability and natural aesthetic. Untreated wood, such as cedar or redwood, is naturally rot-resistant and a good choice for longevity. Pressure-treated lumber is another option, but make sure it’s safe for food gardening. Avoid using wood that has been treated with creosote or other harmful chemicals.
- Composite Lumber: Composite lumber is made from recycled materials and is a durable, low-maintenance option. It’s resistant to rot, insects, and weathering.
- Stone/Brick: Stone or brick raised beds offer a classic and elegant look. They are durable and long-lasting but can be more expensive and require more construction effort.
- Concrete Blocks: Concrete blocks are a budget-friendly option that is easy to work with. They are durable and can be painted or textured to enhance their appearance.
- Metal: Metal raised beds, such as galvanized steel or corrugated metal, are durable and modern-looking. They can heat up quickly in the sun, which can be beneficial in cooler climates.
4. Design Considerations
Before you start building, sketch out a detailed plan of your raised beds. Include the dimensions, materials, and any special features you want to incorporate. Consider the following:
- Corners: Decide how you want to join the corners of your beds. Common options include overlapping boards, using corner brackets, or using mortise and tenon joints.
- Drainage Holes: If your beds don’t have excellent drainage, consider drilling drainage holes in the bottom to prevent waterlogging.
- Liners: You can line your beds with landscape fabric or plastic sheeting to help prevent soil from leaching out and to separate the soil from the wood.
- Paths: Plan for pathways between your raised beds to allow easy access for gardening and maintenance.
- Aesthetics: Consider the overall look and feel you want to achieve in your garden. Choose materials and designs that complement your home and landscape.
Construction Plans: Building Your Raised Garden Beds
Now that you’ve planned your raised garden beds, it’s time to get your hands dirty and start building! The following plans provide a step-by-step guide for constructing a simple, yet sturdy, raised garden bed using wood. These plans are adaptable, allowing you to customize the dimensions to fit your needs.
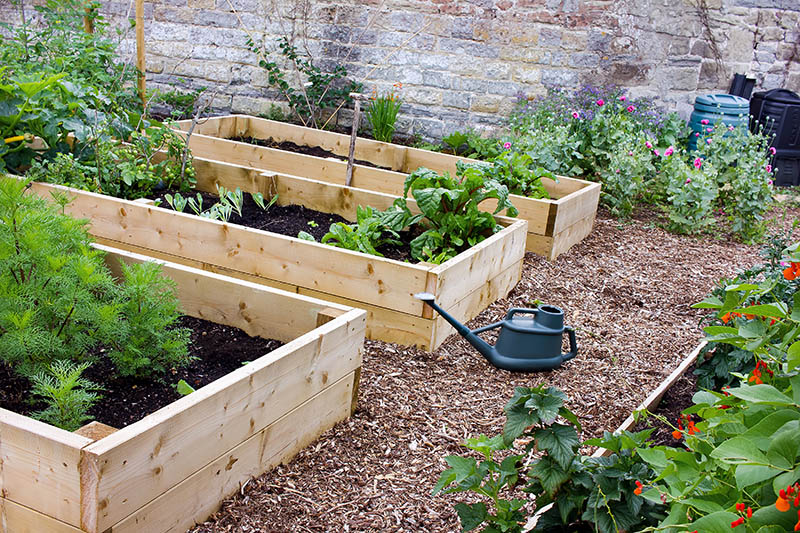
Plan 1: The Basic Wooden Raised Bed
This plan outlines the construction of a simple rectangular raised bed using untreated lumber. It’s a great project for beginners.
Materials You’ll Need:
- Untreated lumber (cedar, redwood, or pine):
- Four boards for the sides (e.g., 2×6 or 2×8 lumber, depending on the desired height)
- Four corner posts (e.g., 4×4 lumber)
- Wood screws (exterior grade)
- Drill/Driver
- Measuring tape
- Level
- Saw (circular saw or hand saw)
- Safety glasses
- Gloves
Instructions:
- Cut the Lumber: Cut the lumber to the desired dimensions for your raised bed. For example, if you want a 4ft x 8ft bed and are using 2×6 lumber, cut two 2×6 boards to 8 feet long and two 2×6 boards to 4 feet long. Cut four 4×4 posts to the desired height of your bed (e.g., 12-24 inches).
- Assemble the Frame: Place the four corner posts at each corner of the bed. Position the side boards between the posts, flush with the top and bottom edges of the posts.
- Attach the Sides: Use wood screws to attach the side boards to the corner posts. Pre-drill pilot holes to prevent the wood from splitting. Drive the screws through the side boards and into the corner posts.
- Check for Square: Use a measuring tape to ensure the corners are square. Measure diagonally from corner to corner; the measurements should be equal.
- Level the Bed: Place the assembled bed in its desired location and use a level to ensure it is level. Adjust the soil beneath the bed as needed.
- Optional: Add a Liner: Line the inside of the bed with landscape fabric or plastic sheeting to help retain soil and prevent the wood from rotting.
- Fill with Soil: Fill the raised bed with a high-quality soil mix suitable for gardening.
Plan 2: Raised Bed with Corner Brackets
This plan simplifies the construction process by using metal corner brackets to join the sides of the bed. This is a great option for beginners and offers a clean, modern look.
Materials You’ll Need:
- Lumber (2×6 or 2×8, depending on desired height)
- Metal corner brackets (exterior grade)
- Wood screws (exterior grade)
- Drill/Driver
- Measuring tape
- Level
- Saw (circular saw or hand saw)
- Safety glasses
- Gloves
Instructions:
- Cut the Lumber: Cut the lumber to the desired dimensions for your raised bed sides.
- Assemble the Frame: Position the side boards to form a rectangle.
- Attach the Brackets: Place a corner bracket at each corner of the bed, ensuring the sides are flush. Use wood screws to attach the brackets to the lumber.
- Check for Square: Measure diagonally from corner to corner to ensure the bed is square.
- Level the Bed: Place the assembled bed in its desired location and use a level to ensure it is level. Adjust the soil beneath the bed as needed.
- Optional: Add a Liner: Line the inside of the bed with landscape fabric or plastic sheeting.
- Fill with Soil: Fill the raised bed with a high-quality soil mix.
Plan 3: Raised Bed with a Simple Frame and Internal Supports (For Longer Beds)
For beds longer than 8 feet, it’s advisable to add internal supports to prevent the sides from bowing outwards. This plan incorporates simple supports.
Materials You’ll Need:
- Lumber (2×6 or 2×8, depending on desired height)
- Lumber for internal supports (same as the sides)
- Wood screws (exterior grade)
- Drill/Driver
- Measuring tape
- Level
- Saw (circular saw or hand saw)
- Safety glasses
- Gloves
Instructions:
- Cut the Lumber: Cut the lumber for the sides and internal supports. For a 4ft x 10ft bed, you would cut two 2×6 boards to 10 feet long and two 2×6 boards to 4 feet long. Cut the internal supports to the width of the bed (4 feet in this example).
- Assemble the Frame: Construct the frame as described in Plan 1 or Plan 2.
- Install Internal Supports: Measure and mark the positions for the internal supports. Place the supports inside the bed, spacing them evenly (e.g., every 4 feet). Secure the supports to the side boards using wood screws.
- Check for Square and Level: Ensure the bed is square and level.
- Add Liner and Soil: Add a liner if desired and fill with soil.
Choosing the Right Soil for Your Raised Beds
The quality of your soil is paramount to the success of your garden. In raised beds, you have the advantage of creating the perfect soil environment for your plants. Here’s how to choose and prepare the right soil mix:
- Soil Composition: A good soil mix for raised beds typically consists of a blend of the following components:
- Topsoil: Provides the base structure and essential nutrients.
- Compost: Adds organic matter, improves drainage, and provides nutrients.
- Peat Moss or Coco Coir: Improves water retention and aeration.
- Vermiculite or Perlite: Improves drainage and aeration.
- Soil Testing: Before adding soil, consider getting your soil tested. This will help you determine the current nutrient levels and pH of your soil, allowing you to make informed decisions about amendments.
- Amending the Soil: Based on your soil test results and the specific needs of your plants, you may need to amend your soil. Common amendments include:
- Compost: Adds nutrients and improves soil structure.
- Manure: Provides nutrients, but should be well-rotted before use.
- Lime: Raises the pH of acidic soil.
- Sulfur: Lowers the pH of alkaline soil.
- Fertilizers: Provide essential nutrients, but use them sparingly and according to the package instructions.
- Soil Depth: The ideal soil depth for raised beds depends on the plants you intend to grow. Generally, a depth of 12-24 inches is sufficient for most vegetables and flowers. Deeper beds may be needed for plants with extensive root systems.
Planting and Caring for Your Raised Garden Beds
Once your raised beds are constructed and filled with soil, it’s time to start planting! Here are some tips for planting and caring for your raised garden beds:
- Choosing Plants: Select plants that are well-suited to your climate, sunlight conditions, and soil type. Consider the mature size of the plants and space them accordingly.
- Planting Methods: Follow the planting instructions for each type of plant. You can start seeds directly in the raised beds or transplant seedlings.
- Watering: Water your plants regularly, especially during dry periods. Raised beds tend to dry out faster than in-ground gardens, so consistent watering is crucial. Consider using a soaker hose or drip irrigation system.
- Fertilizing: Fertilize your plants as needed, following the instructions on the fertilizer package. Organic fertilizers, such as compost tea or fish emulsion, are a good choice.
- Weeding: Regularly remove weeds from your raised beds. Weeds compete with your plants for nutrients and water.
- Mulching: Apply a layer of mulch to the surface of your soil. Mulch helps to retain moisture, suppress weeds, and regulate soil temperature.
- Pest and Disease Control: Monitor your plants for pests and diseases. Take action promptly if you notice any problems. Use organic pest control methods whenever possible.
- Crop Rotation: Practice crop rotation to prevent soilborne diseases and nutrient depletion. Rotate your crops each year, avoiding planting the same type of plant in the same location.
- Succession Planting: Extend your harvest by planting successive crops throughout the growing season. As one crop finishes, plant another in its place.
Maintenance and Longevity of Your Raised Garden Beds
With proper care and maintenance, your raised garden beds can last for many years. Here are some tips to ensure their longevity:
- Regular Inspection: Inspect your beds regularly for any signs of damage or wear.
- Repairing Damage: Address any damage promptly. Replace any rotting boards or loose screws.
- Cleaning: Keep your beds clean and free of debris.
- Soil Replenishment: Replenish the soil in your beds periodically. Add compost, manure, or other organic matter to maintain soil fertility.
- Winterizing: In colder climates, consider winterizing your raised beds. This may involve covering them with a tarp or plastic sheeting to protect the soil from the elements. You can also plant cover crops to improve soil health over the winter.
- Material Considerations: If using wood, consider applying a wood preservative to extend the life of the beds. However, ensure the preservative is safe for food gardening.
Troubleshooting Common Issues
Even with the best planning and construction, you may encounter some challenges with your raised garden beds. Here are some common issues and how to address them:
- Poor Drainage: If your beds are not draining well, check for drainage holes in the bottom. If there are no holes, drill some. You can also amend the soil with more organic matter or add perlite or vermiculite to improve drainage.
- Soil Compaction: Over time, soil can become compacted. Loosen the soil periodically with a garden fork or trowel.
- Weed Infestation: If weeds are a problem, consider using a weed barrier, mulching, or hand-weeding regularly.
- Pest Problems: If pests are damaging your plants, try organic pest control methods, such as insecticidal soap or neem oil. You can also hand-pick pests or use row covers to protect your plants.
- Nutrient Deficiencies: If your plants are showing signs of nutrient deficiencies, get your soil tested and amend it accordingly. You can also use a balanced fertilizer.
Embrace the Joy of Gardening
Building raised garden beds is a rewarding project that can bring years of joy and satisfaction. By following these construction plans, you can create a beautiful and productive garden that provides fresh, healthy food and a connection to nature. Don’t be afraid to experiment, learn, and adapt your gardening practices as you gain experience. The most important thing is to enjoy the process and the fruits (and vegetables!) of your labor. Happy gardening!
Frequently Asked Questions (FAQ)
Here are some frequently asked questions about raised garden beds:
- What is the best wood to use for raised garden beds? Untreated cedar and redwood are excellent choices due to their natural rot resistance. Pine is also a common and affordable option, but it may require more frequent maintenance.
- How deep should a raised garden bed be? The depth depends on the plants you want to grow. For most vegetables and flowers, a depth of 12-24 inches is sufficient.
- Do I need to put anything on the bottom of a raised garden bed? You can line the bottom with landscape fabric or plastic sheeting to help retain soil and prevent the wood from rotting. Drainage holes are essential.
- How often do I need to water raised garden beds? Watering frequency depends on the weather and the needs of your plants. Raised beds tend to dry out faster than in-ground gardens, so consistent watering is important, especially during hot and dry periods.
- How do I prevent weeds in raised garden beds? Use a weed barrier, mulch, and hand-weed regularly.
- How long do raised garden beds last? With proper care and maintenance, raised garden beds can last for many years, even decades.
- Can I build raised beds on a slope? Yes, you can build raised beds on a slope. You may need to level the beds or build retaining walls to prevent soil erosion.


