Introduction: The Enduring Beauty of Perennials and the Joy of Propagation
Perennials, those steadfast garden companions, offer a unique blend of beauty and resilience. They grace our landscapes year after year, providing vibrant color, texture, and a sense of established tranquility. But what if you could multiply this beauty, sharing it with friends, expanding your garden, or simply experiencing the satisfaction of nurturing new life? This is where the art and science of perennial plant propagation comes into play.
Propagation, in essence, is the process of creating new plants from existing ones. It’s a rewarding endeavor that allows gardeners to not only increase their plant collection but also to gain a deeper understanding of plant life cycles and the intricate workings of nature. This comprehensive guide will delve into the various methods of perennial plant propagation, equipping you with the knowledge and techniques to successfully cultivate your favorite perennials.
Why Propagate Perennials? Benefits Beyond the Blooms
While the aesthetic appeal of a thriving perennial garden is undeniable, there are numerous other compelling reasons to embrace propagation:
- Cost Savings: Buying mature perennials can be expensive. Propagating your own plants is a cost-effective way to expand your garden without breaking the bank.
- Sharing with Others: Propagation allows you to share the beauty of your garden with friends, family, and fellow gardening enthusiasts.
- Preserving Rare Varieties: If you have a unique or rare perennial, propagation is crucial for preserving its lineage and ensuring its continued existence.
- Expanding Your Garden: Propagation is the key to filling your garden with more of the plants you love, creating a richer and more diverse landscape.
- Learning and Appreciation: The process of propagation fosters a deeper appreciation for the intricacies of plant life and the delicate balance of nature.
Understanding the Basics: Key Factors for Successful Propagation
Before diving into specific methods, it’s essential to grasp some fundamental principles that underpin successful perennial propagation:
- Timing: The optimal time for propagation varies depending on the method and the specific plant species. Research the best time to propagate your chosen perennials.
- Cleanliness: Maintaining a clean environment is crucial to prevent disease and pest infestations. Sterilize tools and use fresh, sterile potting mix.
- Proper Medium: The potting mix should provide adequate drainage, aeration, and nutrient retention. A mix of peat moss, perlite, and compost is often a good choice.
- Watering: Proper watering is essential, but avoid overwatering, which can lead to root rot. Keep the soil consistently moist but not soggy.
- Light: Adequate light is necessary for photosynthesis and growth. Provide the appropriate light levels for the specific plants you are propagating.
- Patience: Propagation takes time and patience. Don’t be discouraged if you don’t see results immediately.
Methods of Perennial Plant Propagation: A Detailed Exploration
Now, let’s explore the diverse methods of perennial plant propagation, each with its own advantages and specific techniques:
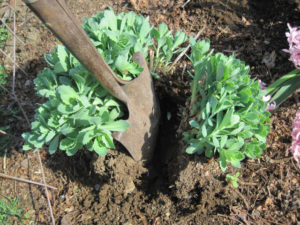
1. Division: The Simplest and Most Common Method
Division is arguably the easiest and most common method of propagating perennials. It involves separating a mature plant into smaller sections, each with its own roots and shoots. This method is particularly well-suited for clump-forming perennials.
How to Divide Perennials: A Step-by-Step Guide
- Timing: The best time to divide most perennials is in the spring or fall, when the plant is not actively flowering.
- Preparation: Water the plant thoroughly the day before division.
- Digging Up the Plant: Carefully dig up the entire plant, ensuring you get as much of the root system as possible.
- Separating the Plant: Gently shake off excess soil. Use your hands, a garden fork, or a sharp knife to divide the plant into smaller sections, each with healthy roots and shoots.
- Replanting: Replant the divisions in their new locations, ensuring they are planted at the same depth as the original plant.
- Watering: Water the newly divided plants thoroughly.
Perennials Suited to Division:
Many popular perennials thrive with division, including:
- Daylilies (Hemerocallis)
- Hostas (Hosta)
- Coneflowers (Echinacea)
- Irises (Iris)
- Bee Balm (Monarda)
- Black-Eyed Susans (Rudbeckia)
2. Cuttings: Cloning Your Favorite Plants
Cuttings involve taking a portion of a plant (stem, leaf, or root) and encouraging it to develop roots, thus creating a new plant. This method is a great way to clone your favorite perennials and preserve their exact characteristics.
Types of Cuttings:
- Stem Cuttings: The most common type, stem cuttings involve taking a piece of stem, usually 4-6 inches long, and removing the lower leaves.
- Leaf Cuttings: Suitable for plants like sedums and African violets, leaf cuttings involve taking a leaf and placing it in a rooting medium.
- Root Cuttings: Some perennials, like oriental poppies, can be propagated from root cuttings.
How to Take Stem Cuttings: A Detailed Guide
- Timing: The best time to take stem cuttings is during the growing season, when the plant is actively growing.
- Selecting Cuttings: Choose healthy, non-flowering stems.
- Preparing the Cuttings: Cut the stem just below a node (the point where leaves emerge). Remove the lower leaves, leaving only a few at the top.
- Rooting Hormone (Optional): Dip the cut end of the stem in rooting hormone to encourage root development.
- Planting the Cuttings: Insert the cuttings into a rooting medium, such as a mix of peat moss and perlite, or a specialized rooting mix.
- Providing the Right Conditions: Keep the cuttings in a warm, humid environment with bright, indirect light.
- Watering and Waiting: Water the cuttings regularly, keeping the soil consistently moist. Roots should develop in a few weeks.
- Transplanting: Once the cuttings have developed roots, transplant them into individual pots or their permanent locations.
Perennials Suited to Cuttings:
Many perennials can be propagated from cuttings, including:
- Lavender (Lavandula)
- Salvia
- Chrysanthemums (Chrysanthemum)
- Russian Sage (Perovskia atriplicifolia)
- Veronica
3. Seeds: The Slow but Rewarding Path
Propagating perennials from seed is a longer process than division or cuttings, but it’s a rewarding way to experience the full life cycle of a plant and often results in a larger number of new plants. The seeds can be collected from your existing plants or purchased from reputable seed suppliers.
How to Sow Perennial Seeds: A Step-by-Step Guide
- Seed Collection/Purchase: Collect seeds from your existing plants when they are ripe, or purchase high-quality seeds.
- Stratification (If Necessary): Some perennial seeds require a period of cold stratification (exposure to cold temperatures) to break dormancy and germinate. This can be done by placing the seeds in the refrigerator for several weeks.
- Sowing the Seeds: Sow the seeds in a seed-starting mix, following the instructions on the seed packet.
- Providing the Right Conditions: Keep the seed-starting mix moist and provide adequate light and warmth.
- Thinning and Transplanting: Once the seedlings have developed their first true leaves, thin them out and transplant them into individual pots or larger containers.
- Hardening Off: Before transplanting the seedlings outdoors, gradually acclimate them to outdoor conditions (hardening off).
- Transplanting: Transplant the seedlings into their permanent locations in the garden.
Perennials Suited to Seed Propagation:
Many perennials can be propagated from seed, including:
- Columbine (Aquilegia)
- Blanket Flower (Gaillardia)
- Lupine (Lupinus)
- Hollyhock (Alcea)
- Shasta Daisy (Leucanthemum)
4. Layering: Encouraging Roots While the Plant Stays Connected
Layering is a natural propagation method where a stem of a plant is encouraged to develop roots while still attached to the parent plant. This allows the new plant to receive nutrients and water from the parent plant until it’s well-established.
Types of Layering:
- Simple Layering: Bend a low-growing stem to the ground, bury a portion of it in the soil, and secure it with a peg.
- Tip Layering: Bend the tip of a stem into the soil and bury it.
How to Layer Perennials: A Practical Guide
- Timing: The best time to layer perennials is in the spring or fall.
- Selecting a Stem: Choose a healthy, flexible stem that can be easily bent to the ground.
- Preparing the Stem: Remove the leaves from the portion of the stem that will be buried.
- Burying the Stem: Dig a shallow trench and bury the prepared portion of the stem in the soil, securing it with a peg or a rock.
- Watering: Keep the soil moist.
- Separating the Layer: Once the layered stem has developed roots, usually after a few months or a year, cut it from the parent plant and transplant it to its new location.
Perennials Suited to Layering:
Some perennials that readily propagate through layering include:
- Creeping Phlox (Phlox subulata)
- Trailing Rosemary (Rosmarinus officinalis prostratus)
- Some varieties of Sedum
5. Offsets: Nature’s Own Clones
Some perennials produce offsets, which are small, genetically identical plants that grow from the parent plant. These offsets can be easily detached and replanted to create new plants.
How to Propagate from Offsets:
- Timing: The best time to separate offsets is during the growing season.
- Identifying Offsets: Look for small plantlets growing around the base of the parent plant.
- Separating the Offsets: Gently detach the offsets from the parent plant, ensuring they have their own roots.
- Replanting: Plant the offsets in their new locations.
- Watering: Water the newly planted offsets thoroughly.
Perennials That Produce Offsets:
Examples of perennials that produce offsets include:
- Hens and Chicks (Sempervivum)
- Some varieties of Iris
Troubleshooting Common Propagation Problems
Even with the best techniques, propagation can sometimes present challenges. Here are some common problems and how to address them:
- Failure to Root: If cuttings or divisions fail to root, ensure the right conditions (warmth, humidity, proper medium) and consider using rooting hormone.
- Root Rot: Overwatering is a common cause of root rot. Ensure proper drainage and avoid soggy soil.
- Pest Infestations: Inspect plants regularly for pests and treat them promptly.
- Disease: Use clean tools and sterile potting mix to prevent diseases.
- Slow Growth: Provide adequate light and nutrients.
Conclusion: Embrace the Journey of Propagation
Perennial plant propagation is a rewarding and accessible endeavor for any gardener. By mastering these methods, you can not only expand your garden and share your passion with others but also deepen your understanding of the natural world. Whether you’re a seasoned gardener or just starting out, the journey of propagation is filled with learning, discovery, and the simple joy of nurturing new life. So, gather your tools, choose your favorite perennials, and embark on this exciting adventure. Happy propagating!


