Unlock Lush Gardens: A Comprehensive Guide to Rainwater Harvesting
Imagine a garden bursting with vibrant colors, flourishing with life, and thriving even during the driest spells. Now, picture achieving this not with expensive water bills and unsustainable practices, but with a simple, eco-friendly solution: rainwater harvesting. This guide delves deep into the world of collecting and utilizing rainwater for your garden, offering a comprehensive understanding of the benefits, methods, and practical tips to transform your outdoor space into an oasis of green.
Why Rainwater Harvesting for Your Garden? The Benefits Unveiled
Before we dive into the ‘how,’ let’s explore the ‘why.’ Rainwater harvesting isn’t just a trendy eco-practice; it’s a powerful tool with a multitude of advantages for your garden, your wallet, and the environment. Here’s a breakdown of the key benefits:
1. Water Conservation: A Sustainable Approach
In an era of increasing water scarcity, conserving this precious resource is more critical than ever. Rainwater harvesting provides a sustainable alternative to relying solely on municipal water supplies or well water, both of which can be subject to restrictions and fluctuating costs. By capturing rainwater, you reduce your dependence on these sources, contributing to a more responsible and environmentally conscious approach to gardening.
2. Cost Savings: Reducing Your Water Bills
Let’s face it, water bills can be a significant expense, especially during the peak growing season when your garden demands the most hydration. Rainwater harvesting offers a direct route to cost savings. The water you collect is essentially free, reducing the amount of treated water you need to purchase. Over time, the savings can be substantial, making rainwater harvesting a smart financial investment.
3. Superior Water Quality: Tailored for Plants
Rainwater is naturally soft and free from the chemicals, such as chlorine and fluoride, commonly found in treated tap water. This makes it an ideal choice for plants. The absence of these additives promotes healthier root development, enhances nutrient absorption, and reduces the risk of mineral buildup in the soil. Plants simply thrive on rainwater!
4. Environmental Responsibility: Minimizing Your Footprint
By choosing rainwater harvesting, you’re actively participating in environmental stewardship. You’re reducing the demand on municipal water systems, which often rely on energy-intensive treatment and distribution processes. You’re also helping to mitigate stormwater runoff, which can carry pollutants into waterways and contribute to erosion. Rainwater harvesting is a win-win for both your garden and the planet.
5. Promoting Plant Health: A Thriving Ecosystem
The benefits of rainwater extend beyond mere water conservation. The natural composition of rainwater provides plants with the essential elements they need to flourish. This can lead to increased yields for edible plants, more vibrant blooms for ornamental flowers, and overall healthier growth for all your garden inhabitants. Rainwater helps create a thriving ecosystem within your garden.
Getting Started: Rainwater Harvesting Methods
Now that you’re convinced of the benefits, let’s explore the practical aspects of rainwater harvesting. There are several methods to choose from, ranging from simple DIY solutions to more complex, professionally installed systems. The best approach for you will depend on your budget, space availability, and gardening needs.
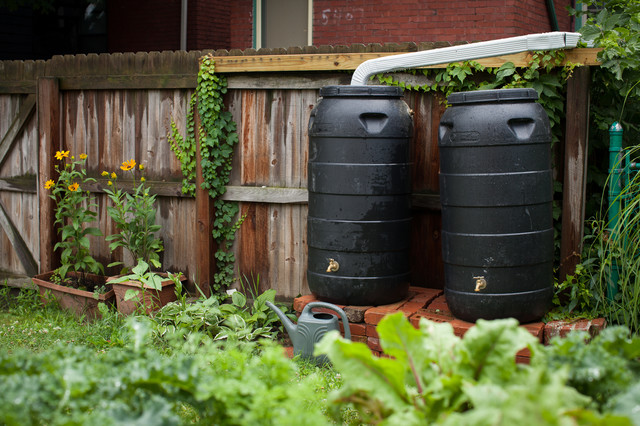
1. Rain Barrels: The Classic and Accessible Option
Rain barrels are the most common and accessible method for rainwater harvesting. They are relatively inexpensive, easy to install, and require minimal maintenance. Here’s how they work:
- Collection: A rain barrel is placed under a downspout that directs water from your roof.
- Filtration: A screen or filter is typically installed at the top of the barrel to prevent debris like leaves and twigs from entering.
- Storage: The barrel fills with rainwater as it flows from the downspout.
- Usage: You can access the water via a spigot or by attaching a hose.
Rain barrels come in various sizes and materials, from plastic to wood. Choose a barrel that suits your needs and aesthetic preferences. Consider the size of your roof area and the amount of rainfall you typically receive when selecting a barrel capacity.
2. Above-Ground Tanks: Increased Storage Capacity
For those with larger gardens or greater water needs, above-ground tanks offer increased storage capacity compared to rain barrels. These tanks can hold hundreds or even thousands of gallons of water, providing a more substantial supply for irrigation. They are typically made of durable materials like polyethylene or fiberglass and can be connected to multiple downspouts for enhanced collection.
While more expensive than rain barrels, above-ground tanks offer several advantages:
- Larger capacity: Allowing you to store more water for extended dry periods.
- Enhanced water quality: The larger volume of water can help to settle out sediment.
- Improved aesthetics: Many tanks are designed to blend seamlessly into your landscape.
3. Underground Cisterns: Maximizing Space and Efficiency
Underground cisterns are a more sophisticated and permanent rainwater harvesting solution. They are buried below ground, offering a discreet storage option that doesn’t take up valuable surface space. Underground cisterns are typically constructed from concrete, plastic, or fiberglass and can hold vast quantities of water.
While the initial investment is higher, underground cisterns offer significant benefits:
- Space-saving: Ideal for properties with limited space.
- Temperature regulation: The water remains cooler and less prone to algae growth.
- Extended storage: Suitable for long-term water storage.
- Higher capacity: Meeting the needs of large gardens or multiple irrigation zones.
Installation of an underground cistern typically requires professional expertise.
4. DIY Rainwater Harvesting Systems: A Hands-On Approach
For the budget-conscious gardener, DIY rainwater harvesting systems offer a cost-effective way to get started. You can assemble a simple system using readily available materials. This might involve connecting a rain barrel to a downspout, adding a screen or filter, and creating a gravity-fed irrigation system.
DIY systems can be a rewarding project, allowing you to customize the system to your specific needs. However, it’s essential to research and follow safety guidelines to ensure the system functions correctly and doesn’t pose any risks.
Setting Up Your Rainwater Harvesting System: A Step-by-Step Guide
Ready to embark on your rainwater harvesting journey? Here’s a step-by-step guide to help you set up your system:
Step 1: Assess Your Needs and Site
Before you begin, evaluate your garden’s water requirements and the characteristics of your property. Consider the following:
- Garden size: Determine the size of your garden and the amount of water you typically use for irrigation.
- Rainfall patterns: Research the average rainfall in your area to estimate the amount of water you can collect.
- Roof type: Choose a roof material that is suitable for rainwater harvesting (e.g., asphalt shingles, metal). Avoid roofs treated with chemicals or containing asbestos.
- Space availability: Identify suitable locations for your rain barrel or tank, considering access to downspouts and proximity to your garden.
- Local regulations: Check with your local authorities for any regulations or restrictions related to rainwater harvesting.
Step 2: Choose Your System Components
Based on your assessment, select the appropriate components for your system. This may include:
- Collection surface: Your roof is the primary collection surface.
- Gutters and downspouts: Ensure these are clean and in good working order.
- Rain barrel or tank: Choose the size and material that meets your needs.
- First-flush diverter (optional): This device diverts the initial flow of water, which may contain debris, away from your storage tank.
- Filter: Install a screen or filter to remove leaves, twigs, and other debris.
- Overflow mechanism: Provide a way for excess water to drain away when the tank is full.
- Spigot or valve: For accessing the water.
- Hose and irrigation system: Connect your system to a hose or irrigation setup.
Step 3: Installation
Follow these general installation guidelines:
- Prepare the site: Level the ground where you’ll place your rain barrel or tank.
- Connect to downspout: Disconnect the downspout from the existing drainage system and direct it towards your rain barrel or tank.
- Install the filter: Place a screen or filter at the top of the barrel or tank inlet.
- Connect the overflow: Attach an overflow pipe to the tank and direct it away from your foundation.
- Install the spigot or valve: Attach a spigot or valve for water access.
- Connect the hose or irrigation system: Attach a hose or connect your system to an irrigation setup.
For underground cisterns, consult with a professional for installation.
Step 4: Maintenance and Upkeep
Regular maintenance is crucial to ensure your rainwater harvesting system functions efficiently and provides clean water:
- Clean gutters and downspouts: Regularly remove leaves, debris, and any other obstructions.
- Inspect the filter: Clean or replace the filter as needed.
- Check for leaks: Periodically inspect the system for leaks.
- Remove sediment: Periodically drain and clean the rain barrel or tank to remove sediment buildup.
- Control algae growth: In sunny locations, consider using a shade cover or adding a small amount of food-grade chlorine to prevent algae growth.
Rainwater Harvesting: Beyond the Basics
Once you have a basic rainwater harvesting system in place, you can explore more advanced techniques and applications to maximize the benefits:
1. First Flush Diverters: Enhancing Water Quality
A first-flush diverter is a device that diverts the initial flow of rainwater, which often contains debris and pollutants accumulated on the roof, away from your storage tank. This helps to improve the water quality and reduces the need for frequent cleaning.
2. Filtration Systems: Fine-Tuning Water Purity
For applications requiring higher water purity, such as watering edible plants or filling a swimming pool, consider incorporating a more sophisticated filtration system. This might include a combination of pre-filters, sediment filters, and activated carbon filters.
3. Irrigation Systems: Efficient Water Distribution
Combine your rainwater harvesting system with an efficient irrigation system, such as drip irrigation or soaker hoses, to deliver water directly to the roots of your plants. This minimizes water waste and promotes healthy plant growth.
4. Greywater Integration: A Holistic Approach
In some cases, you may be able to integrate your rainwater harvesting system with a greywater system, which reuses water from showers, sinks, and washing machines for irrigation. This can further reduce your water consumption and promote sustainability. However, ensure you comply with local regulations regarding greywater usage.
Troubleshooting Common Rainwater Harvesting Issues
Even the most well-designed rainwater harvesting systems can encounter occasional issues. Here are some common problems and their solutions:
1. Leaks
Leaks can occur in various parts of the system, from the gutters and downspouts to the rain barrel or tank. Regularly inspect the system for leaks and repair them promptly. Common causes of leaks include damaged components, loose connections, and cracks in the storage container.
2. Clogged Filters
Filters can become clogged with debris, reducing the flow of water into the storage tank. Regularly clean or replace the filter to ensure optimal performance. The frequency of cleaning will depend on the amount of debris in your area.
3. Algae Growth
Algae can grow in rain barrels and tanks, especially in sunny locations. To prevent algae growth, keep the tank shaded, add a small amount of food-grade chlorine (follow manufacturer’s instructions), or use an algae-inhibiting product specifically designed for rainwater harvesting systems.
4. Sediment Buildup
Sediment can accumulate in the bottom of the rain barrel or tank over time. Periodically drain and clean the tank to remove sediment buildup. This will help to maintain water quality and prevent clogs in your irrigation system.
5. Overflow
During heavy rainfall, the rain barrel or tank may overflow. Ensure that the system has an adequate overflow mechanism to direct excess water away from your foundation. Consider increasing the storage capacity if overflow is a frequent problem.
Rainwater Harvesting: A Sustainable Future for Your Garden
Rainwater harvesting is more than just a trend; it’s a commitment to sustainability, a way to connect with nature, and a smart investment in your garden’s future. By implementing a rainwater harvesting system, you’re taking control of your water usage, reducing your environmental impact, and creating a thriving oasis in your own backyard.
From the simple elegance of a rain barrel to the sophisticated efficiency of an underground cistern, the options are diverse and adaptable to your unique needs and circumstances. The journey starts with a single step – assessing your needs, choosing a system, and taking action. With each drop of rainwater you collect, you’re contributing to a greener future and cultivating a garden that flourishes with life.
So, embrace the power of the rain. Transform your garden into a testament to sustainability, resilience, and the beauty of nature. Rainwater harvesting is not just a practice; it’s a philosophy, a way to nurture your garden and your commitment to a healthier planet. Start today, and watch your garden thrive, one drop at a time.


