Introduction: Breathing New Life into Your Indoor Jungle
Welcome, fellow plant enthusiasts! There’s a unique joy in nurturing houseplants, watching them unfurl new leaves, and witnessing their vibrant growth. But as your green companions flourish, they eventually outgrow their cozy homes. That’s where repotting comes in – a crucial step in ensuring your plants continue to thrive and bring beauty to your living space. This comprehensive guide will walk you through the repotting process, step by step, empowering you to become a confident plant parent and keep your indoor jungle flourishing. Think of this as a masterclass in giving your plants the space they need to flourish!
Repotting might sound daunting, but trust me, it’s a rewarding experience. It’s a chance to get up close and personal with your plants, understand their needs, and provide them with the foundation they need to reach their full potential. This guide will cover everything from recognizing when your plant needs a new pot to selecting the right soil and providing aftercare. So, grab your gardening gloves, and let’s get started!
Why Repotting is Essential for Healthy Houseplants
Before we dive into the how-to, let’s explore the ‘why.’ Understanding the benefits of repotting will motivate you and help you appreciate the importance of this task. Repotting isn’t just about aesthetics; it’s about the very survival and well-being of your plants.
1. Addressing Root Bound Conditions
One of the primary reasons for repotting is to address root-bound conditions. When a plant’s roots become tightly packed within a pot, they have limited space to grow and absorb essential nutrients and water. This can lead to stunted growth, yellowing leaves, and a general decline in the plant’s health. Imagine trying to live in a cramped apartment – not ideal, right? Your plant feels the same way!
2. Providing Fresh Nutrients and Improved Drainage
Over time, the potting mix in your plant’s container breaks down, losing its ability to retain water and provide adequate drainage. Repotting allows you to refresh the soil, introducing fresh nutrients that promote healthy growth. It also improves drainage, preventing root rot, a common killer of houseplants. Think of it as giving your plant a healthy meal and a comfortable bed.
3. Encouraging Growth and Development
Repotting gives your plant the space it needs to expand its root system. This, in turn, supports the growth of new leaves, stems, and flowers. A larger pot provides more room for the plant to thrive and reach its full potential. It’s like upgrading your plant from a small studio to a spacious mansion!
4. Preventing Disease and Pest Infestations
Healthy plants are more resistant to diseases and pests. Repotting with fresh soil helps to eliminate any existing pathogens or pests that might be lurking in the old potting mix. It’s like giving your plant a fresh start and a clean bill of health.
Recognizing When It’s Time to Repot Your Houseplant
Knowing when to repot is crucial. Repotting too often can stress the plant, while waiting too long can hinder its growth. Here are some telltale signs that your plant needs a new home:
1. Roots Circling the Pot
This is the most obvious sign. Carefully examine the plant’s drainage holes. If roots are emerging from the bottom or circling the inside of the pot, it’s time for a repot. You might even see the roots pushing the plant up and out of the pot. This is a clear indication that your plant is root-bound and needs more space.
2. Slowed Growth
If your plant’s growth has slowed significantly, even during its growing season, it could be a sign that the roots are cramped. The plant may not be able to absorb enough nutrients to support new growth.
3. Frequent Watering
If you find yourself watering your plant more frequently than usual, and the water is running straight through the pot, it could be a sign that the soil is not holding enough moisture because the roots have filled the pot. The roots are essentially blocking the soil from absorbing water.
4. Wilting Despite Adequate Watering
If your plant is wilting even though you’re watering it regularly, root rot or root binding could be the culprit. The roots are unable to absorb water effectively.
5. Salt Buildup
White crusty deposits on the soil surface or the pot itself can indicate a buildup of mineral salts from fertilizers and tap water. Repotting with fresh soil helps to flush out these salts and restore the soil’s balance.
6. The Plant is Top-Heavy
If your plant is top-heavy and prone to tipping over, it may be root-bound and unstable in its current pot. A larger, heavier pot can provide better support.
Step-by-Step Guide to Repotting Houseplants
Now for the fun part! Here’s a detailed, step-by-step guide to repotting your houseplants successfully:
1. Gather Your Supplies
Before you begin, gather all the necessary supplies. This will make the process smoother and more efficient. You’ll need:
- A new pot: Choose a pot that is 1-2 inches larger in diameter than the current pot. Make sure it has drainage holes.
- Potting mix: Select a potting mix that is appropriate for your plant’s specific needs. General-purpose potting mixes are suitable for many houseplants.
- Gardening gloves: To protect your hands.
- Trowel or small shovel: For scooping and moving the soil.
- Watering can: For watering your plant after repotting.
- Optional: Horticultural charcoal, perlite, or other amendments to improve drainage and aeration.
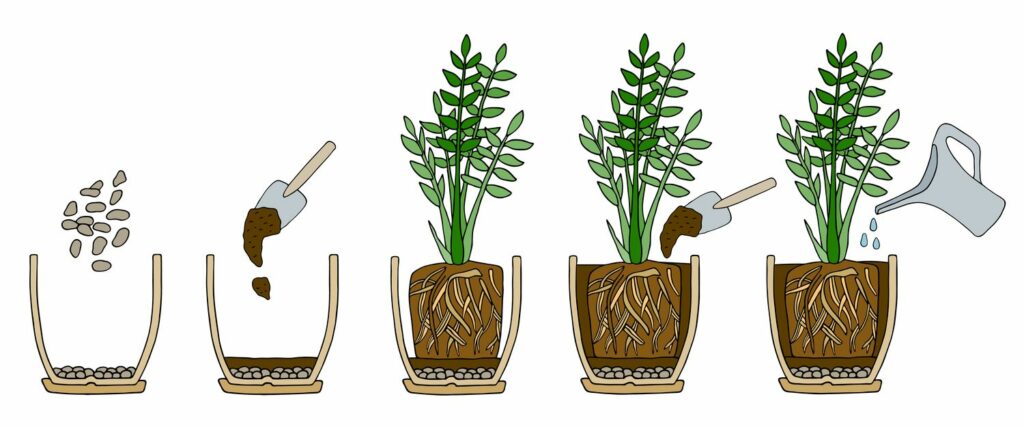
2. Prepare the New Pot
Before you remove the plant from its old pot, prepare the new one. If the new pot is made of clay, soak it in water for a few hours to prevent it from drawing moisture away from the soil. Add a layer of potting mix to the bottom of the pot, enough to raise the plant to the correct level. The top of the root ball should be about an inch below the rim of the pot.
3. Remove the Plant from Its Old Pot
Gently remove the plant from its old pot. If the plant is root-bound, you may need to loosen the soil around the edges of the pot with a trowel or your fingers. Turn the pot upside down and gently tap the bottom to help the plant slide out. If the plant is stuck, you can try gently squeezing the sides of the pot or using a knife to loosen the soil from the edges.
4. Examine the Roots
Once the plant is out of the pot, examine the roots. Gently loosen any circling roots with your fingers or a knife. If the roots are severely root-bound, you may need to trim them. Don’t be afraid to do this – it encourages new growth. Remove any dead or damaged roots. Healthy roots are firm and white or light-colored.
5. Place the Plant in the New Pot
Center the plant in the new pot, ensuring that the top of the root ball is level with or slightly below the rim of the pot. Add potting mix around the root ball, filling in the gaps. Use your fingers or the trowel to gently pack the soil around the roots, but don’t pack it too tightly. Leave about an inch of space between the top of the soil and the rim of the pot.
6. Water Thoroughly
After repotting, water the plant thoroughly until water drains from the drainage holes. This helps to settle the soil and remove any air pockets. Avoid overwatering, as this can lead to root rot. Let the soil dry out slightly between waterings.
7. Provide Aftercare
After repotting, place the plant in a location that receives appropriate light for its species. Avoid direct sunlight for a few days, as this can stress the plant. Monitor the plant for any signs of stress, such as wilting or yellowing leaves. Fertilize the plant with a balanced fertilizer after a month or two, following the manufacturer’s instructions. Continue to provide proper care, including watering and fertilizing, to ensure your plant thrives in its new home.
Choosing the Right Pot and Potting Mix
Selecting the right pot and potting mix is crucial for successful repotting. Let’s explore the factors you should consider:
1. Pot Material
Pots come in various materials, each with its own advantages and disadvantages:
- Terracotta: Porous and allows for excellent drainage and aeration. However, it can dry out quickly and may require more frequent watering.
- Plastic: Lightweight, affordable, and retains moisture well. However, it can retain too much moisture, potentially leading to root rot.
- Ceramic: Stylish and comes in various designs. Similar to plastic in terms of moisture retention.
- Glazed Ceramic: Similar to ceramic, but the glazing can prevent moisture from escaping.
Consider the needs of your plant and your watering habits when choosing a pot material.
2. Pot Size
As mentioned earlier, choose a pot that is 1-2 inches larger in diameter than the current pot. Avoid repotting into a pot that is too large, as this can lead to overwatering and root rot. The plant should have enough room to grow without being overwhelmed by the size of the pot.
3. Drainage Holes
Always choose a pot with drainage holes. These are essential for allowing excess water to drain out of the pot, preventing root rot. If your pot doesn’t have drainage holes, you can drill them yourself or use a layer of gravel at the bottom of the pot to help with drainage.
4. Potting Mix Selection
The right potting mix is just as important as the pot itself. Different plants have different soil requirements. Here are some general guidelines:
- General-purpose potting mix: Suitable for most houseplants.
- Cactus and succulent mix: Well-draining mix designed for succulents and cacti.
- Orchid mix: Coarse mix designed for orchids, providing excellent drainage and aeration.
- African violet mix: Lightweight mix specifically designed for African violets.
When in doubt, research the specific needs of your plant and choose a potting mix accordingly. You can also amend potting mixes with perlite, horticultural charcoal, or other additives to improve drainage and aeration.
Common Mistakes to Avoid When Repotting
Repotting is generally a straightforward process, but there are some common mistakes to avoid:
1. Choosing a Pot That’s Too Large
As mentioned, repotting into a pot that is too large can lead to overwatering and root rot. The excess soil retains too much moisture, and the roots may not be able to absorb it all. Stick to a pot that is only slightly larger than the current one.
2. Damaging the Roots
Be gentle when handling the roots. Avoid tearing or damaging them excessively. If you need to trim the roots, use clean, sharp scissors or a knife.
3. Overwatering After Repotting
After repotting, the plant’s root system is still adjusting to its new environment. Overwatering can lead to root rot. Water thoroughly after repotting, but then let the soil dry out slightly between waterings.
4. Using the Wrong Potting Mix
Using the wrong potting mix can hinder the plant’s growth and health. Make sure to choose a potting mix that is appropriate for your plant’s specific needs.
5. Forgetting to Water
After repotting, it’s crucial to water the plant thoroughly. This helps to settle the soil and remove any air pockets. Don’t forget this important step!
6. Exposing to Direct Sunlight Immediately
After repotting, the plant is more sensitive to stress. Avoid placing it in direct sunlight for a few days, as this can scorch the leaves. Gradually acclimate the plant to its usual light conditions.
Caring for Your Repotted Houseplant
Once you’ve repotted your plant, proper aftercare is essential for its continued health and growth:
1. Watering
Water your plant regularly, allowing the soil to dry out slightly between waterings. The frequency of watering will depend on the plant species, the pot material, and the environmental conditions. Always check the soil moisture before watering.
2. Light
Place your plant in a location that receives appropriate light for its species. Most houseplants thrive in bright, indirect light. Avoid direct sunlight, which can scorch the leaves. Rotate your plant regularly to ensure that all sides receive adequate light.
3. Fertilizing
Fertilize your plant regularly during the growing season (spring and summer). Use a balanced fertilizer, following the manufacturer’s instructions. Avoid over-fertilizing, as this can damage the roots.
4. Pruning
Prune your plant regularly to remove dead or yellowing leaves, encourage new growth, and maintain its shape. Use clean, sharp scissors or pruning shears.
5. Pest Control
Inspect your plant regularly for pests, such as mealybugs, spider mites, and aphids. If you find any pests, treat them promptly with an appropriate insecticide or other pest control method.
6. Monitoring for Problems
Keep an eye on your plant for any signs of problems, such as yellowing leaves, wilting, or stunted growth. Address any issues promptly to prevent them from worsening.
Troubleshooting Common Repotting Issues
Even with the best intentions, problems can arise after repotting. Here’s how to address some common issues:
1. Yellowing Leaves
Yellowing leaves can indicate a variety of problems, including overwatering, underwatering, or nutrient deficiencies. Assess the watering habits, light conditions, and fertilizing schedule to determine the cause. Adjust your care accordingly.
2. Wilting
Wilting can be caused by overwatering, underwatering, or root rot. Check the soil moisture and examine the roots for any signs of rot. Adjust your watering habits and provide adequate drainage.
3. Stunted Growth
Stunted growth can be caused by a variety of factors, including root binding, nutrient deficiencies, or insufficient light. Repot into a larger pot, fertilize regularly, and ensure that the plant receives adequate light.
4. Root Rot
Root rot is a serious problem that can kill your plant. It’s caused by overwatering and poor drainage. If you suspect root rot, remove the plant from its pot and examine the roots. Trim away any rotten roots and repot the plant in fresh, well-draining soil. Adjust your watering habits and ensure adequate drainage.
5. Pest Infestations
If you notice pests on your plant, treat them promptly with an appropriate insecticide or other pest control method. Isolate the affected plant to prevent the infestation from spreading to other plants.
Conclusion: Cultivating a Thriving Indoor Oasis
Repotting your houseplants is a vital part of their care, allowing them to thrive and bring beauty to your home. By following these step-by-step instructions, you can confidently repot your plants and provide them with the space, nutrients, and care they need to flourish. Remember to choose the right pot and potting mix, examine the roots, and provide proper aftercare. With a little patience and attention, you can create a thriving indoor oasis filled with healthy, vibrant plants. Happy repotting!
Don’t be afraid to experiment and learn from your experiences. Every plant is unique, and you’ll become more attuned to their specific needs over time. Enjoy the process, and celebrate the joy of watching your green companions grow and thrive. Your dedication will be rewarded with a lush and beautiful indoor jungle that brings endless pleasure and serenity.


