Introduction: Why Soil Testing Matters for Every Gardener
Gardening, at its heart, is a partnership with nature. We prepare the soil, sow the seeds, provide water and sunlight, and then stand back in anticipation, hoping for a bountiful harvest of flowers, fruits, or vegetables. But sometimes, despite our best efforts, our plants struggle. They might look pale, grow slowly, or fail to produce the yields we expect. More often than not, the culprit is hidden beneath the surface: the soil itself.
Soil isn’t just dirt; it’s a complex ecosystem teeming with minerals, organic matter, and microorganisms. The chemical composition of your soil—its pH level and the availability of essential nutrients—plays a crucial role in plant health and productivity. Without understanding what’s going on in your soil, you’re essentially gardening blindfolded. That’s where soil testing kits come in. These handy tools allow you to peek beneath the surface and gain valuable insights into the health and composition of your garden’s foundation.
This comprehensive guide will walk you through everything you need to know about soil testing kits for gardeners, from understanding the basics of soil science to choosing the right kit for your needs and interpreting the results. We’ll explore the different types of kits available, their pros and cons, and how to use them effectively to unlock your garden’s full potential.
Understanding the Basics of Soil Science
Before diving into soil testing kits, let’s take a moment to review some fundamental soil science concepts. This knowledge will help you understand what the kits are measuring and why it matters.
Soil Composition: The Building Blocks of a Healthy Garden
Healthy soil is composed of four main components:
- Mineral particles: These are derived from weathered rock and provide the basic structure of the soil. They are classified into three main size categories: sand, silt, and clay.
- Organic matter: This consists of decomposed plant and animal material and is essential for soil fertility. It improves soil structure, water retention, and nutrient availability.
- Water: Water is essential for plant growth and nutrient transport. It also supports the activity of beneficial microorganisms in the soil.
- Air: Soil needs air for the roots of plants to breathe and for the microorganisms to thrive.
The ideal balance of these components varies depending on the type of plants you’re growing, but generally, a good garden soil will have a mix of sand, silt, clay, and plenty of organic matter.
Soil pH: The Acidity-Alkalinity Balance
Soil pH is a measure of its acidity or alkalinity, on a scale of 0 to 14. A pH of 7 is neutral, below 7 is acidic, and above 7 is alkaline. Most plants prefer a slightly acidic to neutral pH (between 6.0 and 7.0). However, some plants, like blueberries and azaleas, thrive in more acidic soil, while others, like lavender and clematis, prefer alkaline conditions.
Soil pH affects the availability of nutrients to plants. When the pH is too high or too low, certain nutrients become locked up in the soil and cannot be absorbed by plant roots. This can lead to nutrient deficiencies, even if the nutrients are present in the soil.
Essential Nutrients: The Food Plants Need to Grow
Plants need a variety of nutrients to grow and thrive. These nutrients are typically divided into two categories: macronutrients and micronutrients.
- Macronutrients: These are needed in relatively large amounts. The three primary macronutrients are nitrogen (N), phosphorus (P), and potassium (K), often referred to as NPK. Nitrogen is essential for leaf growth, phosphorus for root development and flowering, and potassium for overall plant health and disease resistance. Other macronutrients include calcium, magnesium, and sulfur.
- Micronutrients: These are needed in smaller amounts but are still essential for plant growth. They include iron, manganese, zinc, copper, boron, and molybdenum.
A deficiency in any of these nutrients can lead to stunted growth, discoloration, and reduced yields. Soil testing kits can help you identify nutrient deficiencies and imbalances so you can amend your soil accordingly.
Types of Soil Testing Kits: Choosing the Right One for Your Needs
Now that you understand the basics of soil science, let’s explore the different types of soil testing kits available to gardeners.
DIY Soil Testing Kits: Quick and Affordable
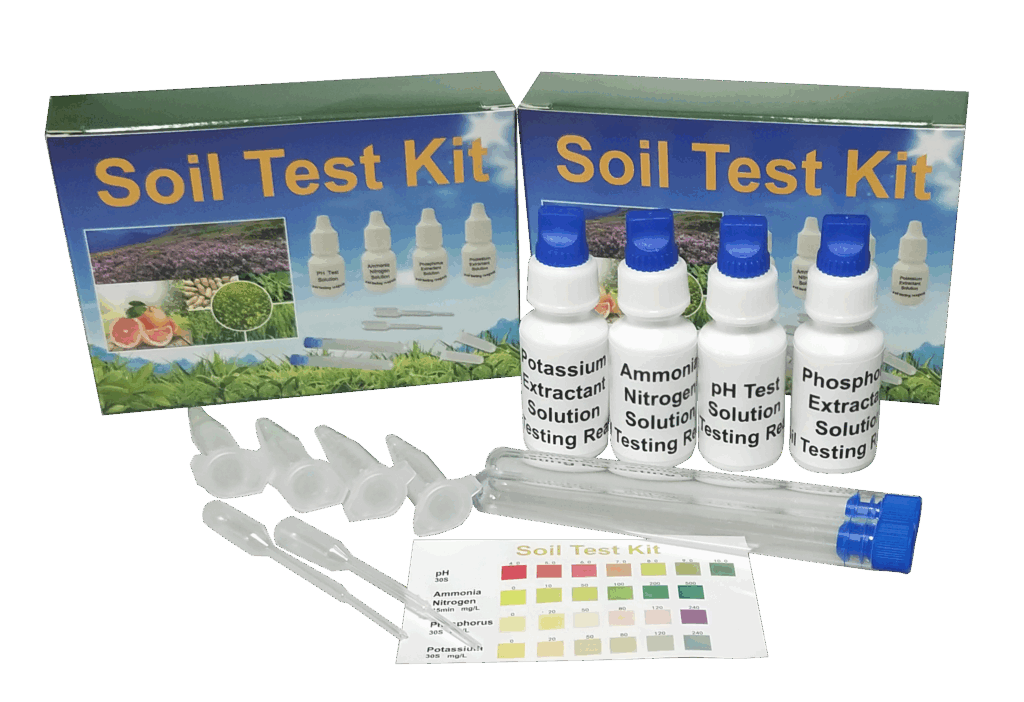
DIY soil testing kits are the most common and affordable option for home gardeners. These kits typically include a small plastic vial, a testing solution, and a color chart. You mix a soil sample with the testing solution and compare the resulting color to the chart to determine the pH level and the approximate levels of NPK.
Pros of DIY Soil Testing Kits:
- Affordable: DIY kits are relatively inexpensive, making them accessible to most gardeners.
- Quick results: You can get results in a matter of minutes.
- Easy to use: The kits are simple to use and require no special equipment or training.
Cons of DIY Soil Testing Kits:
- Limited accuracy: The results are often approximate and may not be as accurate as professional lab tests.
- Limited scope: Most DIY kits only test for pH and NPK, and may not provide information on micronutrients or other important soil properties.
- Subjective interpretation: The color matching process can be subjective, leading to inaccurate results.
Digital Soil Testers: Technology at Your Fingertips
Digital soil testers are handheld devices that use sensors to measure soil pH, moisture, and sometimes nutrient levels. You simply insert the probe into the soil, and the device displays the results on a digital screen.
Pros of Digital Soil Testers:
- Relatively accurate: Digital testers can provide more accurate results than DIY kits.
- Easy to use: The devices are easy to operate and provide instant readings.
- Multi-functional: Some digital testers can measure multiple soil properties, such as pH, moisture, and nutrient levels.
Cons of Digital Soil Testers:
- Cost: Digital testers are more expensive than DIY kits.
- Calibration required: Some digital testers require regular calibration to maintain accuracy.
- Limited nutrient testing: Most digital testers only test for a limited number of nutrients.
Mail-In Soil Testing Kits: Professional Analysis for Accurate Results
Mail-in soil testing kits are the most accurate and comprehensive option for soil testing. These kits typically include a sample bag, instructions for collecting a soil sample, and a prepaid envelope for mailing the sample to a professional soil testing laboratory.
Pros of Mail-In Soil Testing Kits:
- Highly accurate: Professional labs use sophisticated equipment and techniques to analyze soil samples, providing highly accurate results.
- Comprehensive analysis: Labs can test for a wide range of soil properties, including pH, NPK, micronutrients, organic matter content, and soil texture.
- Expert recommendations: Labs typically provide detailed reports with recommendations for soil amendments based on the test results.
Cons of Mail-In Soil Testing Kits:
- Cost: Mail-in kits are the most expensive option for soil testing.
- Time: It can take several weeks to receive the results from the lab.
- Requires careful sampling: Accurate results depend on collecting a representative soil sample.
How to Use Soil Testing Kits Effectively
No matter which type of soil testing kit you choose, it’s important to follow the instructions carefully to ensure accurate results. Here are some general tips for using soil testing kits effectively:
Collecting a Representative Soil Sample: The Foundation of Accurate Results
The accuracy of your soil test results depends on collecting a representative soil sample. This means taking multiple samples from different areas of your garden and combining them into a single composite sample.
- Gather your tools: You’ll need a clean trowel or shovel, a bucket, and a sample bag or container.
- Remove surface debris: Clear away any grass, leaves, or other debris from the soil surface.
- Collect multiple samples: Take samples from at least 5-10 different locations in your garden. Dig down to a depth of about 6-8 inches.
- Combine the samples: Place all of the samples in the bucket and mix them thoroughly.
- Take a composite sample: Remove about a pint of the mixed soil and place it in the sample bag or container.
- Label the sample: Clearly label the sample with your name, the date, and the location of the sample.
Following the Instructions Carefully: Avoiding Common Mistakes
Each soil testing kit comes with its own set of instructions. Read and follow these instructions carefully to avoid common mistakes that can lead to inaccurate results.
- Use distilled water: When mixing soil samples with testing solutions, use distilled water to avoid contamination.
- Measure accurately: Use the measuring tools provided with the kit to ensure accurate measurements of soil and testing solutions.
- Allow sufficient time: Allow the testing solution to react with the soil sample for the recommended amount of time before reading the results.
- Compare carefully: When using a DIY kit with a color chart, compare the color of the solution to the chart in good lighting.
Understanding the Results: Decoding the Numbers and Charts
Once you’ve performed the soil test, you’ll need to understand the results. The results will typically include information on soil pH, NPK levels, and possibly other nutrient levels. Here’s a general guide to interpreting the results:
- Soil pH: As mentioned earlier, most plants prefer a slightly acidic to neutral pH (between 6.0 and 7.0). If your soil pH is too high or too low, you can amend it with lime (to raise the pH) or sulfur (to lower the pH).
- NPK levels: The results will typically indicate whether the levels of nitrogen, phosphorus, and potassium are low, medium, or high. If any of these nutrients are deficient, you can amend your soil with fertilizers or organic matter.
- Micronutrient levels: If your soil test includes micronutrient analysis, the results will indicate whether the levels of iron, manganese, zinc, copper, boron, and molybdenum are adequate. If any of these nutrients are deficient, you can amend your soil with micronutrient fertilizers.
Amending Your Soil Based on Test Results: Creating the Ideal Growing Environment
Once you’ve identified any nutrient deficiencies or imbalances in your soil, you can amend it to create the ideal growing environment for your plants. Here are some common soil amendments and how to use them:
Adjusting Soil pH: Balancing Acidity and Alkalinity
If your soil pH is too high (alkaline), you can lower it by adding sulfur, iron sulfate, or organic matter such as compost or peat moss. If your soil pH is too low (acidic), you can raise it by adding lime (calcium carbonate) or wood ash.
It’s important to adjust soil pH gradually, as drastic changes can harm beneficial soil microorganisms. Test your soil regularly and make small adjustments as needed.
Adding Organic Matter: The Key to Soil Health
Organic matter is essential for soil health. It improves soil structure, water retention, and nutrient availability. You can add organic matter to your soil by incorporating compost, manure, leaf mold, or other organic materials.
Compost is a particularly valuable soil amendment. It’s made from decomposed plant and animal material and is rich in nutrients and beneficial microorganisms. You can make your own compost at home or purchase it from a garden center.
Using Fertilizers: Providing Essential Nutrients
Fertilizers provide essential nutrients to plants. They are available in a variety of forms, including granular, liquid, and slow-release. Choose a fertilizer that is appropriate for the type of plants you’re growing and follow the instructions carefully.
Organic fertilizers, such as compost, manure, and bone meal, are a good option for gardeners who want to avoid synthetic chemicals. They release nutrients slowly and gradually, providing a steady supply of nutrients to plants.
Addressing Specific Nutrient Deficiencies: Tailoring Your Approach
If your soil test reveals specific nutrient deficiencies, you can address them by using targeted fertilizers or soil amendments. For example, if your soil is deficient in nitrogen, you can add a nitrogen-rich fertilizer such as blood meal or fish emulsion. If your soil is deficient in phosphorus, you can add bone meal or rock phosphate. If your soil is deficient in potassium, you can add wood ash or potassium sulfate.
Choosing the Right Plants for Your Soil: Working with What You Have
Another important factor to consider when planning your garden is the type of plants you’re growing. Some plants are more tolerant of acidic or alkaline soil than others. If your soil has a naturally high or low pH, you can choose plants that are well-suited to those conditions.
For example, if your soil is acidic, you can grow plants such as blueberries, azaleas, rhododendrons, and camellias. If your soil is alkaline, you can grow plants such as lavender, clematis, and sedum.
By choosing the right plants for your soil, you can minimize the need for soil amendments and create a thriving garden with minimal effort.
Beyond the Kit: Other Ways to Assess Your Soil
While soil testing kits are invaluable, they aren’t the only way to assess your soil’s health. Here are a few other methods you can use:
The Squeeze Test: A Simple Assessment of Soil Texture
The squeeze test is a simple way to assess your soil’s texture. Moisten a handful of soil and squeeze it in your hand. If the soil crumbles easily, it’s likely sandy. If it forms a ball that holds its shape, it’s likely clayey. If it forms a ball that crumbles easily, it’s likely loamy (a mixture of sand, silt, and clay).
Observing Plant Growth: Clues from Your Garden Itself
Pay attention to the growth of your plants. Are they growing vigorously and producing healthy leaves and flowers? Or are they stunted, discolored, or susceptible to disease? These can be clues about the health of your soil.
For example, yellowing leaves can indicate a nitrogen deficiency, while stunted growth can indicate a phosphorus deficiency.
Professional Soil Analysis: When to Call in the Experts
If you’re having persistent problems with your garden, or if you’re planning a major landscaping project, it may be worth investing in a professional soil analysis. Soil testing laboratories can provide a more comprehensive analysis of your soil than DIY kits, and they can offer expert recommendations for soil amendments.
Conclusion: Empowering Gardeners with Knowledge
Soil testing kits are a valuable tool for gardeners of all levels of experience. By understanding the basics of soil science and using soil testing kits effectively, you can gain valuable insights into the health and composition of your garden’s foundation. This knowledge will empower you to make informed decisions about soil amendments, fertilizer applications, and plant selection, leading to a healthier and more productive garden.
So, take the guesswork out of gardening and start testing your soil today. Your plants will thank you for it!


