Introduction: Why Create a Native Plant Demonstration Garden?
Imagine a garden bursting with vibrant colors, buzzing with life, and perfectly adapted to its environment. This isn’t just a dream; it’s the reality you can create with a native plant demonstration garden. Such a garden serves as a living classroom, showcasing the beauty and ecological benefits of plants indigenous to your region. It’s more than just landscaping; it’s an act of conservation, education, and community engagement. Creating a native plant demonstration garden is a rewarding endeavor that benefits both the environment and the people who interact with it.
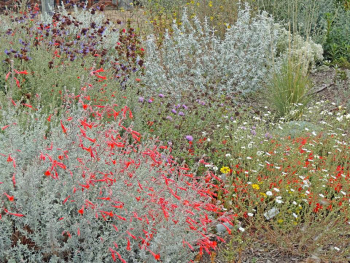
Native plants are species that have evolved naturally in a particular region over a long period. They are perfectly adapted to the local climate, soil conditions, and other environmental factors. This makes them incredibly resilient and low-maintenance compared to non-native or exotic species, which often require significant resources like water, fertilizers, and pesticides to thrive. By choosing native plants, you’re not only creating a beautiful garden but also supporting local ecosystems and reducing your environmental footprint. Native plants provide essential food and habitat for native insects, birds, and other wildlife, contributing to biodiversity and ecological balance.
A demonstration garden goes a step further by showcasing these benefits to the public. It serves as an educational resource, teaching visitors about the importance of native plants, their unique characteristics, and how to incorporate them into their own landscapes. It can inspire others to adopt more sustainable gardening practices and contribute to the conservation of native flora and fauna. Whether you’re a homeowner, a school, a community organization, or a municipality, creating a native plant demonstration garden is a powerful way to promote environmental stewardship and community engagement.
Planning Your Native Plant Demonstration Garden: Laying the Foundation for Success
Before you start digging, careful planning is essential to ensure the success of your native plant demonstration garden. This involves assessing your site, defining your goals, designing the garden layout, and selecting the right plants. A well-thought-out plan will save you time, money, and effort in the long run and ensure that your garden thrives for years to come.
1. Site Assessment: Understanding Your Environment
The first step in planning your garden is to assess your site. This involves evaluating several factors, including:
- Sunlight: How much sunlight does your site receive throughout the day? Is it full sun (6 or more hours), partial shade (3-6 hours), or full shade (less than 3 hours)? Native plants have varying sunlight requirements, so it’s crucial to choose species that are well-suited to your site’s conditions.
- Soil Type: What type of soil do you have? Is it sandy, loamy, clayey, or a combination? Soil type affects drainage, nutrient availability, and pH levels, all of which can impact plant growth. You can perform a simple soil test yourself or send a sample to a lab for professional analysis.
- Drainage: How well does your soil drain? Poor drainage can lead to root rot and other problems. Observe your site after a heavy rain to see if water pools in certain areas. If drainage is poor, you may need to amend the soil or install drainage systems.
- Water Availability: How easily accessible is water for irrigation? While native plants are generally drought-tolerant once established, they may need supplemental watering during dry periods, especially in the first year or two.
- Existing Vegetation: What plants are already growing on your site? Are they native or non-native? Are there any invasive species that need to be removed? Understanding the existing vegetation can help you identify potential challenges and opportunities.
- Microclimates: Are there any microclimates on your site, such as areas that are sheltered from the wind or exposed to reflected heat? These microclimates can influence plant growth and survival.
2. Defining Your Goals: What Do You Want to Achieve?
What are your goals for your native plant demonstration garden? Are you primarily focused on education, conservation, or aesthetics? Do you want to attract specific types of wildlife, such as butterflies or birds? Defining your goals will help you make informed decisions about the design, plant selection, and interpretive signage for your garden. Some common goals include:
- Education: To teach visitors about native plants, their ecological benefits, and how to incorporate them into their own landscapes.
- Conservation: To support local biodiversity by providing habitat for native insects, birds, and other wildlife.
- Aesthetics: To create a beautiful and visually appealing garden that showcases the diversity of native plants.
- Pollinator Habitat: To provide food and shelter for pollinators, such as bees, butterflies, and hummingbirds.
- Water Conservation: To demonstrate the benefits of using drought-tolerant native plants to reduce water consumption.
- Erosion Control: To stabilize slopes and prevent soil erosion using native groundcovers and shrubs.
3. Garden Design: Creating a Visually Appealing and Functional Space
Once you have assessed your site and defined your goals, you can start designing your garden layout. Consider the following factors when designing your garden:
- Theme: Do you want to create a specific theme, such as a butterfly garden, a woodland garden, or a prairie garden? A theme can help you narrow down your plant selection and create a cohesive design.
- Layout: How will you arrange the plants in your garden? Consider factors such as plant height, color, texture, and bloom time. Group plants with similar needs together to make maintenance easier.
- Pathways: How will visitors access the garden? Provide clear and accessible pathways that allow visitors to explore the garden without disturbing the plants.
- Seating: Provide seating areas where visitors can relax and enjoy the garden. Benches, picnic tables, and even large rocks can serve as seating.
- Interpretive Signage: How will you educate visitors about the plants in your garden? Install interpretive signs that provide information about the plants’ names, characteristics, and ecological benefits.
- Water Features: Consider adding a water feature, such as a birdbath or a small pond, to attract wildlife and enhance the garden’s aesthetics.
4. Plant Selection: Choosing the Right Plants for Your Site
Selecting the right plants is crucial for the success of your native plant demonstration garden. Choose plants that are native to your region and well-suited to your site’s conditions. Consider the following factors when selecting plants:
- Native Range: Ensure that the plants you choose are native to your specific region. Avoid using cultivars or hybrids of native plants, as they may not provide the same ecological benefits as the wild-type species.
- Sunlight Requirements: Choose plants that are adapted to the amount of sunlight your site receives.
- Soil Type: Choose plants that are adapted to your soil type. If your soil is poor, consider amending it with compost or other organic matter.
- Water Requirements: Choose plants that are drought-tolerant once established.
- Mature Size: Consider the mature size of the plants when designing your garden. Avoid planting trees or shrubs that will outgrow their space.
- Bloom Time: Choose plants with a variety of bloom times to provide continuous color throughout the growing season.
- Wildlife Value: Choose plants that provide food and habitat for native insects, birds, and other wildlife.
Preparing the Site: Getting Ready to Plant
Once you have planned your garden and selected your plants, it’s time to prepare the site for planting. This involves removing existing vegetation, amending the soil, and installing any necessary infrastructure, such as irrigation systems or pathways. Proper site preparation will give your plants a strong start and ensure their long-term success.
1. Removing Existing Vegetation: Clearing the Way for New Growth
The first step in site preparation is to remove any existing vegetation that will compete with your new plants. This may involve removing grass, weeds, shrubs, or even trees. The method you use to remove vegetation will depend on the type of vegetation and the size of the area you’re clearing.
- Manual Removal: For small areas or light vegetation, you can remove plants manually using hand tools such as shovels, hoes, and weeders. This method is labor-intensive but allows you to selectively remove unwanted plants without disturbing the soil.
- Herbicide Application: For larger areas or persistent weeds, you may need to use herbicides. Choose a herbicide that is specifically designed for the type of vegetation you’re trying to control and follow the manufacturer’s instructions carefully. Be aware that herbicides can harm non-target plants, so use them judiciously.
- Solarization: Solarization is a non-chemical method of weed control that involves covering the soil with clear plastic for several weeks during the hottest part of the year. The plastic traps heat, which kills weed seeds and other soilborne pests.
- Sheet Mulching: Sheet mulching, also known as lasagna gardening, is a method of building soil and suppressing weeds by layering organic materials such as cardboard, newspaper, compost, and mulch. This method is particularly effective for converting lawns into garden beds.
2. Soil Amendment: Improving Soil Quality for Optimal Growth
Most soils can benefit from amendment, especially if they are compacted, poorly drained, or lacking in nutrients. Soil amendment involves adding organic matter, such as compost, manure, or leaf mold, to improve soil structure, drainage, and fertility.
- Compost: Compost is decomposed organic matter that is rich in nutrients and beneficial microorganisms. It can be added to the soil to improve its structure, drainage, and fertility.
- Manure: Manure is animal waste that is rich in nutrients. It should be composted before being added to the soil to avoid burning plants.
- Leaf Mold: Leaf mold is decomposed leaves that are rich in nutrients and beneficial microorganisms. It can be added to the soil to improve its structure and water-holding capacity.
- Other Amendments: Other soil amendments include peat moss, vermiculite, perlite, and sand. These amendments can be used to improve drainage, aeration, and water-holding capacity.
To amend the soil, spread a layer of organic matter over the planting area and till it into the top 6-12 inches of soil. You can also add amendments directly to the planting holes when you plant your plants.
3. Infrastructure Installation: Setting Up the Essentials
Depending on your garden design, you may need to install certain infrastructure, such as irrigation systems, pathways, or fencing. This is best done before you start planting to avoid disturbing the plants.
- Irrigation Systems: If your site is dry or you plan to grow plants that require regular watering, you may need to install an irrigation system. Drip irrigation is a water-efficient method of delivering water directly to the plants’ roots.
- Pathways: Install pathways to provide access to the garden and protect the plants from foot traffic. Pathways can be made from a variety of materials, such as gravel, mulch, stone, or pavers.
- Fencing: If you need to protect your garden from deer, rabbits, or other animals, you may need to install fencing. Choose a fence that is tall enough to deter the animals and that blends in with the surrounding landscape.
Planting Your Native Plants: Bringing Your Garden to Life
Once you have prepared the site, it’s time to plant your native plants. Proper planting techniques are essential to ensure that your plants get off to a good start and thrive for years to come. Choose a planting day that is cool and cloudy to minimize stress on the plants.
1. Planting Techniques: Giving Your Plants a Strong Start
Follow these planting techniques to give your native plants a strong start:
- Dig the Planting Hole: Dig a planting hole that is twice as wide as the root ball and just as deep. This will allow the roots to spread out easily.
- Remove the Plant from the Container: Gently remove the plant from its container. If the roots are circling the pot, loosen them up before planting.
- Place the Plant in the Hole: Place the plant in the hole so that the top of the root ball is level with the surrounding soil.
- Backfill the Hole: Backfill the hole with soil, gently firming it around the root ball.
- Water Thoroughly: Water the plant thoroughly after planting to settle the soil and hydrate the roots.
- Mulch: Apply a layer of mulch around the plant to help retain moisture, suppress weeds, and regulate soil temperature.
2. Spacing: Giving Plants Room to Grow
Proper spacing is essential to ensure that your plants have enough room to grow and thrive. Follow the spacing recommendations on the plant labels or in your planting plan. Consider the mature size of the plants when determining spacing.
- Groundcovers: Space groundcovers closely together to create a dense mat that will suppress weeds.
- Perennials: Space perennials according to their mature size. Overcrowding can lead to disease and reduced flowering.
- Shrubs: Space shrubs according to their mature size. Consider the shape and growth habit of the shrubs when determining spacing.
- Trees: Space trees far enough apart to allow for their mature canopy spread. Consider the height and shape of the trees when determining spacing.
3. Timing: Planting at the Right Time of Year
The best time to plant native plants is typically in the spring or fall, when the weather is cool and moist. This allows the plants to establish their roots before the heat of summer or the cold of winter. Avoid planting during the hottest or coldest months of the year.
- Spring Planting: Spring planting is ideal for plants that need a long growing season to establish their roots. Plant after the last frost.
- Fall Planting: Fall planting is ideal for plants that prefer cool weather and moist soil. Plant before the ground freezes.
Maintaining Your Native Plant Demonstration Garden: Ensuring Long-Term Success
Once your native plant demonstration garden is established, it will require ongoing maintenance to ensure its long-term success. This includes watering, weeding, mulching, pruning, and pest control. Regular maintenance will keep your garden looking its best and ensure that it continues to provide ecological benefits.
1. Watering: Providing Supplemental Moisture When Needed
While native plants are generally drought-tolerant once established, they may need supplemental watering during dry periods, especially in the first year or two. Water deeply and infrequently to encourage deep root growth. Avoid overwatering, which can lead to root rot.
- Watering Frequency: Water plants when the top inch of soil feels dry to the touch.
- Watering Method: Use a soaker hose or drip irrigation to deliver water directly to the plants’ roots. Avoid overhead watering, which can promote fungal diseases.
- Watering Time: Water plants in the early morning or late evening to minimize water loss due to evaporation.
2. Weeding: Keeping Unwanted Plants at Bay
Weeds can compete with your native plants for water, nutrients, and sunlight. Regular weeding is essential to keep your garden healthy and attractive. Remove weeds manually using hand tools such as hoes and weeders. Avoid using herbicides, which can harm non-target plants.
- Weeding Frequency: Weed your garden regularly, especially during the growing season.
- Weeding Method: Pull weeds by hand, making sure to remove the entire root system. Use a hoe or weeder to loosen the soil around the weeds before pulling them.
- Mulching: Apply a layer of mulch around your plants to help suppress weeds.
3. Mulching: Retaining Moisture and Suppressing Weeds
Mulch is a layer of organic material that is spread around plants to help retain moisture, suppress weeds, and regulate soil temperature. Mulch can be made from a variety of materials, such as wood chips, bark, straw, or leaves. Apply a layer of mulch 2-4 inches thick around your plants, keeping it away from the stems to prevent rot.
- Mulch Materials: Choose a mulch material that is appropriate for your plants and your climate. Wood chips and bark are good choices for most gardens. Straw and leaves are good choices for vegetable gardens.
- Mulch Application: Apply mulch in the spring or fall. Replenish the mulch as needed to maintain a layer of 2-4 inches.
4. Pruning: Shaping and Maintaining Your Plants
Pruning is the process of removing dead, damaged, or unwanted branches from plants. Pruning can help to improve the shape, health, and flowering of your plants. Prune your plants at the appropriate time of year, depending on the species.
- Pruning Frequency: Prune plants as needed to remove dead, damaged, or unwanted branches.
- Pruning Tools: Use sharp, clean pruning tools to avoid spreading diseases.
- Pruning Techniques: Follow proper pruning techniques to avoid damaging the plants. Consult a pruning guide or a professional arborist for specific instructions.
5. Pest Control: Managing Pests Naturally
Native plants are generally more resistant to pests and diseases than non-native plants. However, they can still be affected by certain pests and diseases. Manage pests and diseases naturally by promoting healthy plant growth, encouraging beneficial insects, and using organic pest control methods.
- Healthy Plant Growth: Healthy plants are more resistant to pests and diseases. Provide your plants with adequate water, nutrients, and sunlight.
- Beneficial Insects: Encourage beneficial insects, such as ladybugs and lacewings, to prey on pests. Provide habitat for beneficial insects by planting flowering plants that attract them.
- Organic Pest Control Methods: Use organic pest control methods, such as insecticidal soap, neem oil, or horticultural oil, to control pests. Avoid using synthetic pesticides, which can harm beneficial insects and other wildlife.
Community Engagement and Education: Sharing the Benefits of Your Garden
A native plant demonstration garden is not just a beautiful space; it’s also a valuable educational resource for the community. Engaging the community and providing educational opportunities can help to raise awareness about the importance of native plants and promote sustainable gardening practices.
1. Interpretive Signage: Educating Visitors About Native Plants
Install interpretive signs throughout the garden to educate visitors about the plants’ names, characteristics, and ecological benefits. The signs should be informative, engaging, and easy to understand. Consider including photos or illustrations to enhance the visual appeal of the signs.
- Sign Content: Include information about the plants’ native range, habitat, and wildlife value. Explain how the plants contribute to the local ecosystem.
- Sign Design: Design the signs to be visually appealing and easy to read. Use clear, concise language and include photos or illustrations.
- Sign Placement: Place the signs in strategic locations throughout the garden where visitors can easily see them.
2. Educational Programs: Offering Workshops and Tours
Offer educational programs, such as workshops and tours, to teach the community about native plants and sustainable gardening practices. These programs can be tailored to different age groups and interests. Consider partnering with local organizations or experts to provide a variety of educational opportunities.
- Workshop Topics: Offer workshops on topics such as native plant identification, propagation, and gardening techniques.
- Tour Themes: Offer tours that focus on different aspects of the garden, such as pollinator habitat, water conservation, or erosion control.
- Program Promotion: Promote your educational programs through local media, community events, and online platforms.
3. Volunteer Opportunities: Engaging the Community in Garden Maintenance
Engage the community in garden maintenance by offering volunteer opportunities. Volunteers can help with weeding, mulching, planting, and other tasks. This is a great way to get people involved in the garden and to foster a sense of ownership and stewardship.
- Volunteer Tasks: Provide a variety of volunteer tasks to suit different skill levels and interests.
- Volunteer Training: Provide training to volunteers on proper gardening techniques and safety procedures.
- Volunteer Recognition: Recognize volunteers for their contributions to the garden.
4. Partnerships: Collaborating with Local Organizations
Collaborate with local organizations, such as schools, garden clubs, and environmental groups, to promote the native plant demonstration garden and to expand its reach. These partnerships can provide access to new audiences and resources.
- School Partnerships: Partner with local schools to provide educational opportunities for students.
- Garden Club Partnerships: Partner with local garden clubs to share knowledge and resources.
- Environmental Group Partnerships: Partner with local environmental groups to promote conservation efforts.
Conclusion: A Living Legacy of Biodiversity and Beauty
Creating a native plant demonstration garden is a rewarding endeavor that benefits both the environment and the community. By following these steps, you can create a beautiful and functional space that showcases the diversity and ecological benefits of native plants. Your garden will serve as a living classroom, inspiring others to adopt more sustainable gardening practices and contribute to the conservation of native flora and fauna. It’s a gift that keeps on giving, enriching the lives of people and wildlife for generations to come. Embrace the opportunity to create a living legacy of biodiversity and beauty in your community.


