The secret to a thriving garden isn’t just about sunshine and water; it’s about what’s happening beneath the surface. Soil, the very foundation of your plants’ lives, plays a crucial role in their health and vitality. And at the heart of healthy soil lies pH, a measure of its acidity or alkalinity. Mastering soil pH levels is like unlocking a hidden treasure, revealing the key to vibrant blooms, robust vegetables, and a garden that truly flourishes. In this comprehensive guide, we’ll delve into the world of soil pH, exploring its importance, how to test it, and most importantly, how to manage it to create the perfect growing environment for your beloved plants.
Understanding the Significance of Soil pH
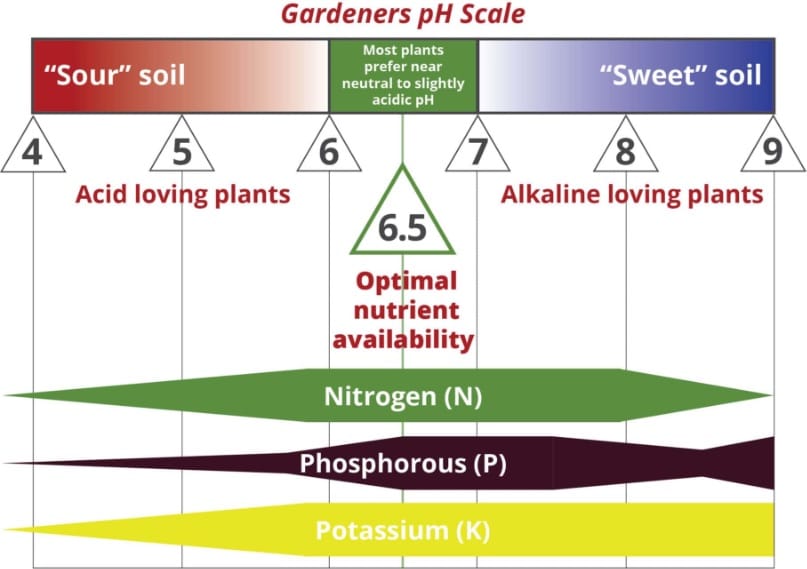
Imagine your plants as tiny chefs, and the soil as their kitchen. The pH level is like the seasoning, the precise balance that determines whether their culinary creations (your plants) will be a masterpiece or a disaster. Soil pH, measured on a scale of 0 to 14, dictates the availability of essential nutrients. A pH of 7 is considered neutral; values below 7 are acidic, and values above 7 are alkaline (or basic).
Why is this so important? Because it directly impacts nutrient availability. Think of it like this: even if your soil has plenty of nutrients, if the pH is off, your plants might not be able to access them. Certain nutrients, such as iron, manganese, and zinc, are more readily available in acidic soil, while others, like phosphorus and calcium, thrive in slightly alkaline conditions. A soil pH that’s too high or too low can lead to nutrient deficiencies, stunted growth, and increased susceptibility to diseases. This is why understanding and managing soil pH is paramount for any gardener, from the seasoned veteran to the enthusiastic beginner.
The Ideal pH Range for Different Plants
While a pH of 6.0 to 7.0 is often considered ideal for most plants, the specific needs vary depending on the species. Here’s a general overview:
- Most Vegetables: Generally prefer a pH between 6.0 and 7.0.
- Acid-loving Plants (e.g., blueberries, azaleas, rhododendrons): Thrive in a more acidic environment, typically between 4.5 and 6.0.
- Alkaline-loving Plants (e.g., lavender, clematis): Can tolerate or even prefer a slightly alkaline pH, often between 7.0 and 8.0.
- General Garden Plants: A pH of 6.0 to 7.0 is usually suitable for a wide variety of plants.
Knowing the specific pH requirements of your plants is the first step in creating a thriving garden. This knowledge will guide your soil management efforts and help you avoid common pitfalls.
Testing Your Soil pH: The First Step to Success
You can’t manage what you don’t measure. Testing your soil pH is the cornerstone of any successful soil management strategy. Fortunately, it’s a relatively simple process, and there are several methods to choose from.
Methods for Testing Soil pH
- DIY Soil pH Test Kits: These are readily available at most garden centers and online retailers. They typically involve mixing a soil sample with a solution and comparing the resulting color to a chart. These kits are inexpensive and easy to use, making them a great option for beginners. However, they may not be as accurate as other methods.
- Digital Soil pH Meters: These meters provide a more precise reading of your soil’s pH. You simply insert the probe into the soil and read the digital display. Digital meters are more accurate than test kits but can be more expensive. Calibration is essential for accuracy.
- Professional Soil Testing: For the most accurate results, consider sending a soil sample to a local agricultural extension office or a professional soil testing lab. They will provide a detailed analysis of your soil’s pH, nutrient levels, and other important factors. This is the most comprehensive option but also the most expensive.
How to Conduct a Simple Soil pH Test
Here’s a basic guide to using a DIY soil pH test kit:
- Collect a Soil Sample: Use a trowel or garden fork to collect soil from several different areas of your garden. Take samples from a depth of about 4-6 inches. Mix the samples together in a clean container.
- Prepare the Soil Sample: Follow the instructions on your test kit. Typically, this involves mixing a small amount of soil with a specified amount of distilled water.
- Add the Indicator Solution: Add the indicator solution provided in the kit to the soil and water mixture.
- Observe the Color Change: After a few minutes, the mixture will change color. Compare the color to the chart provided with the kit. The chart will indicate the approximate pH level of your soil.
- Repeat the Test: For more accurate results, repeat the test several times and take an average of the readings.
Remember to follow the instructions on your specific test kit carefully. Consistent and accurate testing is crucial for effective soil management.
Adjusting Soil pH: The Path to Balanced Soil
Once you know your soil’s pH, you can take steps to adjust it to the ideal range for your plants. This process involves adding amendments to either lower or raise the pH level. The choice of amendment will depend on whether your soil is too acidic or too alkaline.
Raising Soil pH (Making it More Alkaline)
If your soil is too acidic, you’ll need to add materials that increase the pH. The most common amendment for raising soil pH is:
- Lime (Calcium Carbonate or Dolomitic Lime): Lime is an excellent choice for raising pH. It neutralizes acidity and provides calcium and magnesium, which are essential nutrients for plant growth. The amount of lime needed depends on your soil’s current pH and texture. Heavier soils (clay) require more lime than lighter soils (sandy). Applying lime is best done in the fall or winter to allow time for it to break down and integrate into the soil.
How to Apply Lime:
- Test Your Soil: Determine your soil’s pH level using a soil test kit or by sending a sample to a laboratory.
- Calculate the Application Rate: Based on your soil test results, determine the amount of lime needed per square foot or per garden bed. Your soil test report will often provide specific recommendations.
- Spread the Lime: Evenly distribute the lime over the soil surface. Use a spreader for larger areas.
- Incorporate the Lime: Till or dig the lime into the soil to a depth of about 6-8 inches. This will help it mix with the soil and neutralize acidity more effectively.
- Water Thoroughly: Water the soil thoroughly after applying lime. This will help the lime dissolve and react with the soil.
Lowering Soil pH (Making it More Acidic)
If your soil is too alkaline, you’ll need to add materials that decrease the pH. Common amendments for lowering soil pH include:
- Sulfur: Sulfur is a slow-acting soil acidifier. It reacts with soil bacteria to form sulfuric acid, gradually lowering the pH. Sulfur is a good choice for long-term pH adjustments. The amount of sulfur needed depends on your soil’s current pH and texture.
- Aluminum Sulfate: Aluminum sulfate is a faster-acting acidifier than sulfur. However, it can also add aluminum to the soil, which can be toxic to some plants. Use aluminum sulfate with caution and follow the manufacturer’s recommendations.
- Acidifying Organic Matter (e.g., peat moss, composted pine needles): Incorporating organic matter into your soil can help to lower the pH, although the effect is usually less dramatic than with sulfur or aluminum sulfate. Organic matter also improves soil structure, water retention, and drainage.
How to Apply Sulfur:
- Test Your Soil: Determine your soil’s pH level using a soil test kit or by sending a sample to a laboratory.
- Calculate the Application Rate: Based on your soil test results, determine the amount of sulfur needed per square foot or per garden bed. Your soil test report will often provide specific recommendations.
- Spread the Sulfur: Evenly distribute the sulfur over the soil surface.
- Incorporate the Sulfur: Till or dig the sulfur into the soil to a depth of about 6-8 inches.
- Water Thoroughly: Water the soil thoroughly after applying sulfur.
- Re-test: It can take several months for sulfur to fully lower soil pH. Re-test your soil after a few months to determine if further applications are needed.
Important Considerations When Adjusting Soil pH:
- Gradual Changes: It’s best to make gradual changes to your soil pH. Avoid making drastic adjustments, as this can shock your plants.
- Re-testing: Re-test your soil after making any amendments to ensure that the pH has reached the desired level.
- Soil Texture: The texture of your soil (sandy, silty, or clay) affects how quickly amendments work. Clay soils tend to hold amendments longer than sandy soils.
- Plant Preferences: Always consider the specific pH requirements of the plants you are growing.
Long-Term Soil Health and pH Management
Managing soil pH isn’t a one-time fix; it’s an ongoing process. Several practices can help maintain a healthy soil pH and create a thriving garden environment.
Best Practices for Maintaining Optimal Soil pH:
- Regular Soil Testing: Test your soil pH at least once a year, or more frequently if you are experiencing plant problems.
- Amend with Organic Matter: Regularly adding organic matter, such as compost, well-rotted manure, or leaf mold, improves soil structure, drainage, and water retention. Organic matter also helps buffer against pH fluctuations.
- Mulching: Mulching your garden beds with organic materials, such as wood chips or straw, helps retain moisture, suppress weeds, and slowly release nutrients into the soil. Some mulches, like pine needles, can also help to slightly acidify the soil over time.
- Choose the Right Plants: Consider the pH of your soil when selecting plants. Choose plants that are well-suited to your soil conditions.
- Avoid Over-fertilizing: Over-fertilizing can negatively impact soil pH. Follow the manufacturer’s recommendations for fertilizer application rates.
- Crop Rotation: Rotating crops can help prevent nutrient depletion and maintain a balanced soil environment.
Troubleshooting Common Soil pH Problems
Even with the best management practices, you may encounter some common soil pH problems. Here’s how to address them:
- Yellowing Leaves (Chlorosis): This can be a sign of iron deficiency, which is often caused by high soil pH. Correct the pH by adding sulfur or other acidifying amendments.
- Stunted Growth: Poor pH levels can hinder nutrient uptake, leading to stunted growth. Test your soil pH and adjust it to the appropriate range for your plants.
- Poor Flowering or Fruiting: If your plants are not producing abundant flowers or fruit, the soil pH may be to blame. Ensure that the pH is within the optimal range for your plants.
- Increased Susceptibility to Diseases and Pests: Plants that are stressed due to poor soil pH are more vulnerable to diseases and pests. Maintain a healthy soil pH to promote plant health and resilience.
Conclusion: Cultivating a Thriving Garden Through Soil pH Mastery
Managing soil pH is a fundamental aspect of successful gardening. By understanding the importance of pH, testing your soil regularly, and making informed adjustments, you can create a thriving environment where your plants can flourish. Remember, patience and consistency are key. Soil pH management is an ongoing process, but the rewards – vibrant blooms, bountiful harvests, and a garden that truly thrives – are well worth the effort. So, grab your soil test kit, get your hands dirty, and embark on the journey to unlock the full potential of your garden. Happy gardening!


